PACKED BINARIES (And how to unpack them)
Hello all! I’m writing this post for learning purposes, as research about the topic on the title. The main idea is to better understand how the packing mechanism works and the techniques and ways to apply this, with a particular focus on malware development and analysis and how today’s malware executables try to hide from different detection systems.
That’s why, in my style, I think that before starting to look for unpacking mechanisms or similar resources, we first need to understand how an actual binary is formed, what its structure of itself, and how a “packer” will use this information to create a “packed” executable.
We will need to identify the sections we want to read or modify if necessary when packing executables. This will also provide good information if we are performing any Reverse Engineering work, especially in modified binaries or malware samples that try to “hide” information on the binary itself. (this would be the primary goal behind it, how can malicious code can hide from Reverse Engineering)
I will try to not approach the “packing” process as a compression mechanism (which is very popular also) but rather than that. We will try to focus on learning how a packer works and then try to pack malicious code into a file. Also, we can then work on unpacking techniques with some malware samples to see if we can apply this knowledge.
As a disclaimer, I assume that the reader is familiar with programming concepts and has some Windows Internal and assembly knowledge, not expert level, but at least able to understand instructions and code flow.
With that said, Let’s get it!
Which tools or programs will I use for this post:
- CFF Explorer https://ntcore.com/?page_id=388
- GCC for Windows (MinGW) https://sourceforge.net/projects/mingw/files/Installer/mingw-get-setup.exe/download
- UPX for Windows https://upx.github.io/
- x32dbg https://x64dbg.com/
- IDA (free version) https://hex-rays.com/ida-free/
- Any Text Editor
Executable files and the PE Format
https://docs.fileformat.com/executable/exe/
Before start analyzing and modifying executables, we need to answer the question: What is an executable File?
An executable file is referred to in general as a file that will cause a computer to perform tasks according to instructions on the referred file. In Windows OS, popular extensions for executable files are .BAT, .EXE, .DLL, .COM, etc.
The word EXE is short for an executable by default; a Windows OS will try to “execute” all files with this extension. (invoked from the command line or double-click on the GUI). We will focus on this extension for practical reasons. For that, We can Write a small program in C, which we will call hello.c and we can open our text editor and code it as follow:
#include <stdio.h>

int main(){
    puts("AAAA Hello");
    return 0;
}
Following is the command to compile it:
gcc hello.c -fno-pie -o a.exe
We can now test our binary it should print to stdout the string “AAAA hello” the idea behind the “AAAA” is just to quickly identify the string in memory if we need to

Great, so we have a binary, and we want to “pack” it, so before manipulating the binary, let’s better understand how it is constructed. We can investigate this since, in Windows, executables follow the PE format, a file format for executables files. Let’s take a look at it.
What is the PE format?
https://docs.microsoft.com/en-us/windows/win32/debug/pe-format
PE stands for Portable Executable, and it is a format file for executables, DLLs, and other binaries that are executed under Windows systems on x64 and x86 architectures. The PE format is a Data Structure that contains the information necessary for the OS to load and execute the binary. This can include the IAT (Import Address Table) and the TLS (Thread Local Storage). The PE format is a successor of the previous format used on Windows NT systems called COFF (Common Object File Format), which is still present on the structures as a table.
The PE Format:
A typical PE format will have the following structure on file:

https://resources.infosecinstitute.com/
The diagram above represents the PE Structure. And as It’s highlighted, we can observe 2 main subdivisions: The headers and The Section(s) and their different components. To better understand it, it’s necessary to describe each of these in detail.
A note on RVA or Relative Virtual Address
Before digging into the headers, It’s necessary to clear the dust in some concepts.
RVA or Relative Virtual Address is a value that represents the offset to the image base that corresponds to the Virtual Address of that specific address in an example:
VA = RVA + BaseImage
This concept will help us to determine the location of different functions and sections in the binary. The base image can be preferred if no ASLR (Address Space Layout Randomization) is enabled; otherwise, it can be randomized, so this can change the Virtual Address value in every binary load. In our case, we will compile the binaries with no ASLR just to make it accessible to focus on the concepts and not on bypassing randomization, but this is important to keep in mind.
For example, let’s use the information in CFF explorer to test this.
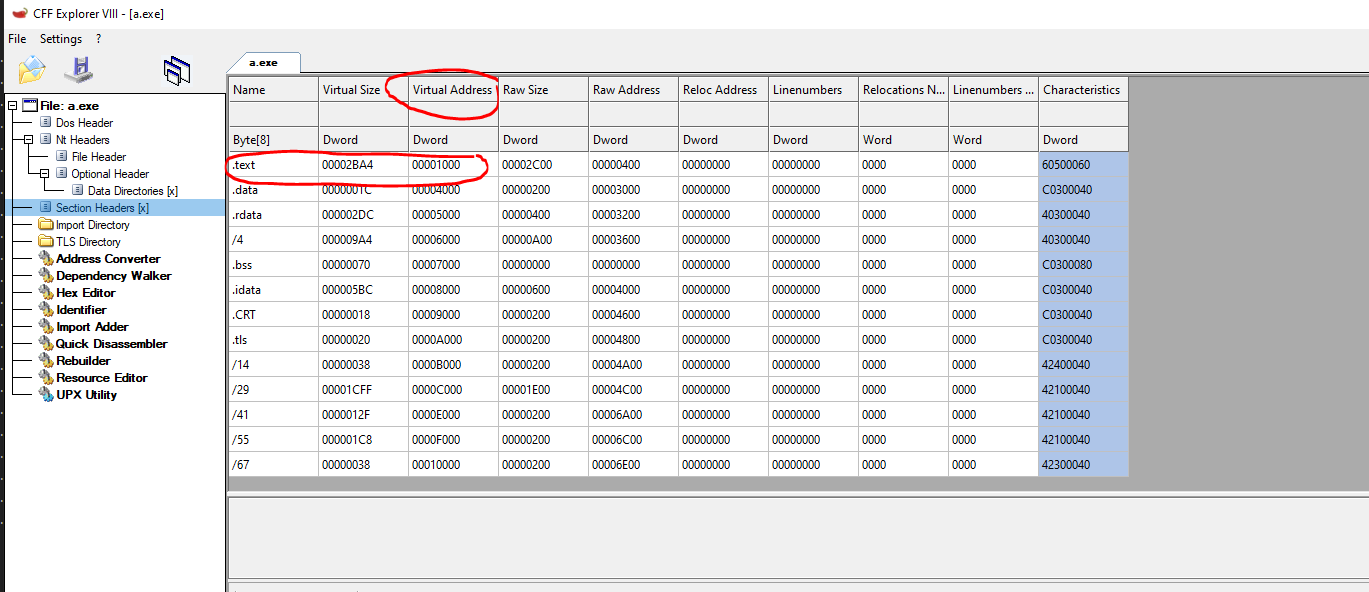
You can see that the RVA of the .text section holds the 0x1000 value. This means that the .text section should load at BaseImage + 0x1000. We will inspect the preferred BaseImage of this binary later on, but it is set to 0x400000, so the address should load at 0x401000. Let’s open this on x32dbg and see if we can spot where the .text section was loaded. We can check this by opening the executable on the debugger and going to “view->Memory map.”
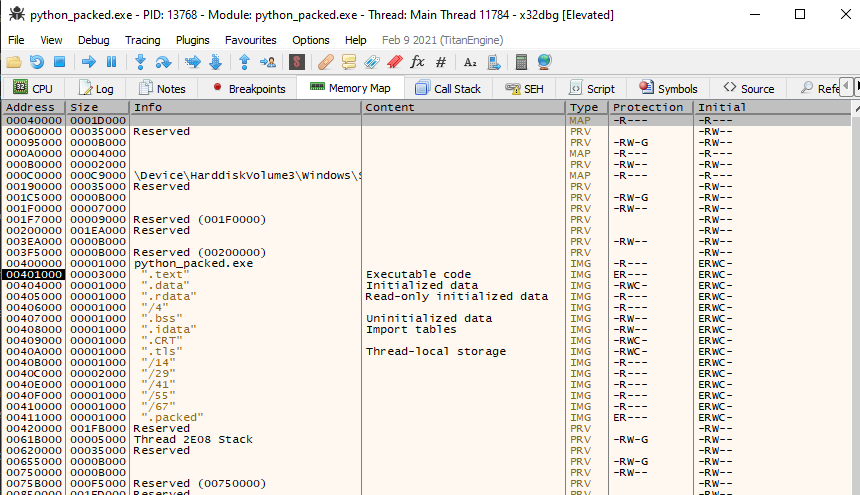
The screenshot above shows that our calculations were correct. We can use this to refer to execution, which will be important when we start going deeper into the binary itself.
DOS HEADER
https://docs.microsoft.com/en-us/archive/msdn-magazine/2002/february/inside-windows-win32-portable-executable-file-format-in-detail
The DOS_HEADER is the first piece of every PE executable. It is not essential to current programs’ functionality but is for legacy compatibility. The DOS_HEADER structure is 64 bytes long, and the primary purpose of the header is to make the file execute under MS-DOS.
typedef struct _IMAGE_DOS_HEADER
{
     WORD e_magic;
     WORD e_cblp;
     WORD e_cp;
     WORD e_crlc;
     WORD e_cparhdr;
     WORD e_minalloc;
     WORD e_maxalloc;
     WORD e_ss;
     WORD e_sp;
     WORD e_csum;
     WORD e_ip;
     WORD e_cs;
     WORD e_lfarlc;
     WORD e_ovno;
     WORD e_res[4];
     WORD e_oemid;
     WORD e_oeminfo;
     WORD e_res2[10];
     LONG e_lfanew;
} IMAGE_DOS_HEADER, *PIMAGE_DOS_HEADER;
Above, we can see how the DOS_HEADER is structured in different fields with different sizes. This field contains information about the program and also about other structures in the PE. As an example and something that can be useful to identify the start of a PE executable, we can take a look at the value of the e_magic field. This field always Starts with a magic value of 0x45DA which can be represented in ASCII as “MZ”. This is a reference to Marz Zbikowski, who was the designer of the MS-DOS executable format. Let’s check this in CFF explorer. This tool has a friendly interface to inspect the sections and structures, and also, you see the Hex representation of the binary.
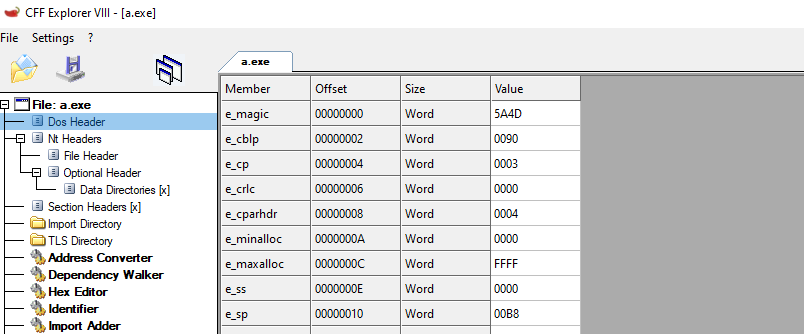
Listed Above is the CFF explorer representation of the DOS_HEADER. We can see the Values match our expected results, and the 0x45DA is on the e_magic field. Also, The Hex representation confirms the ASCII translation of this as MZ.
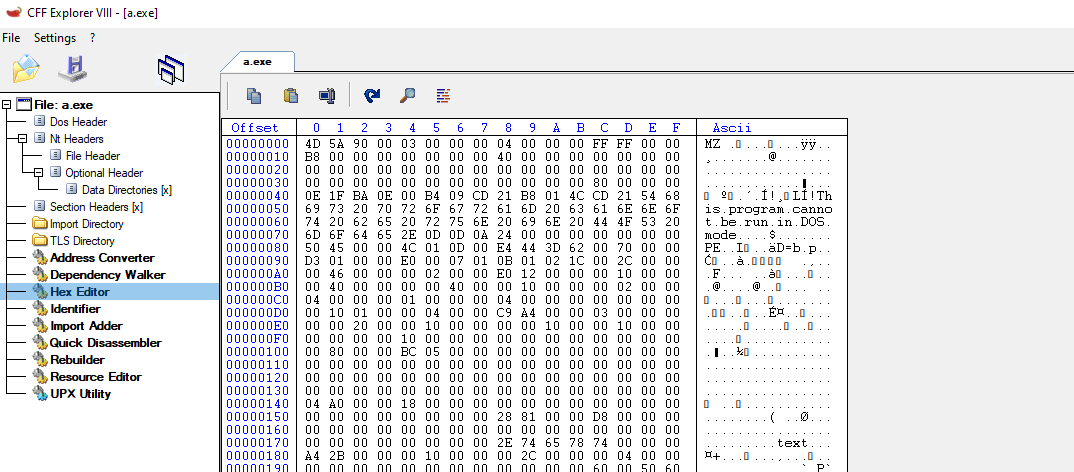
We can inspect these fields if we want, but the one that interests us is the e_lfanew field which is the only one required to have a value for the file to execute. This is because this field contains a relative offset to the following header, the NT_HEADER, which is crucial to execution. This field is located at offset 0x3C from the beginning of our file. We can check this in CFF explorer also.
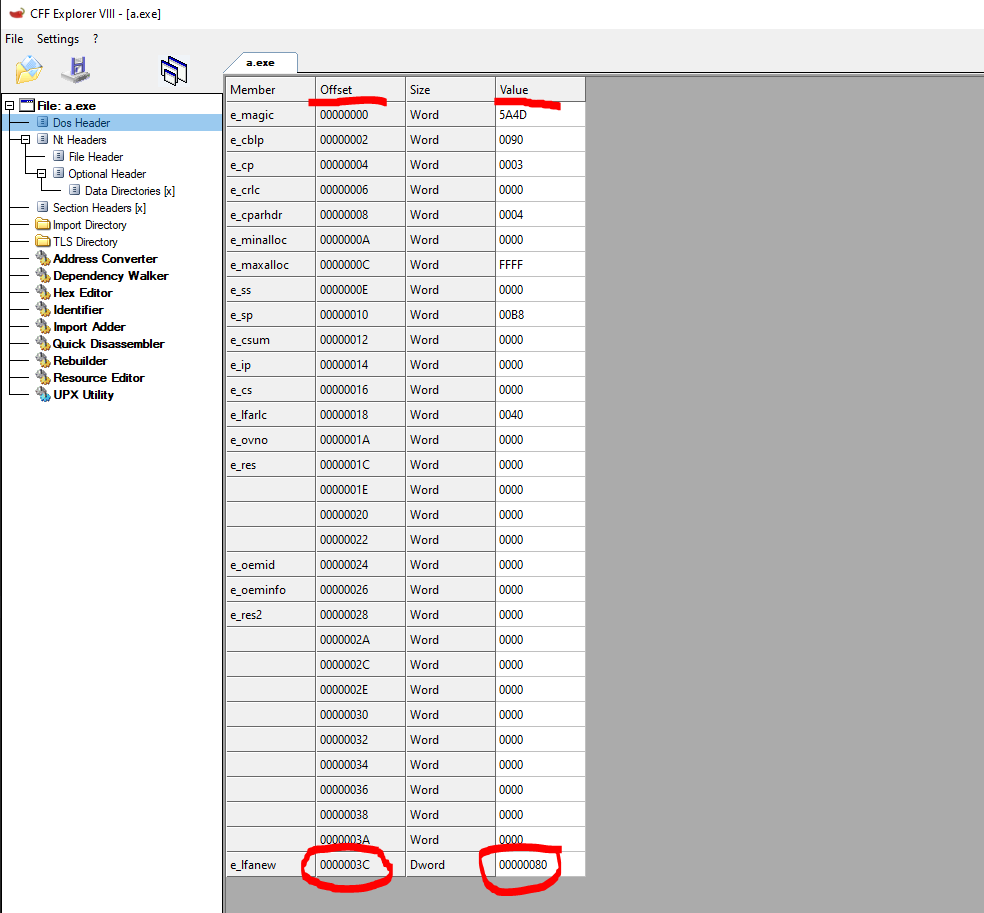
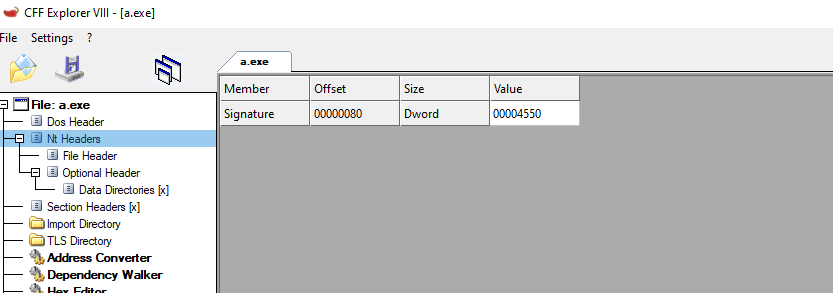
We can confirm the offset of 0x3c and the value 0x80. This value is the offset from the beginning of the file to the NT_HEADER. This can also confirm in CFF Explorer by clicking on the NT_HEADER section.
DOS STUB
Next in the file found the DOS STUB. This small program is created to print a message when the file is executed in MS-DOS. That’s why we usually see in programs a message “This program cannot be run in DOS mode.” It is worth keeping in mind that this is not really required to run the file, but still, it can help us to locate, for example, a PE loaded inside the program to be loaded in memory. Still, this is not always the case. Since it is mentioned above, you can replace this string, which will not stop the binary from running correctly, but it still can be part of your reverse engineering routine.
Rich Header
Before the NT_HEADER and after the DOS stub, if we look at the program we compiled using CFF explorer, we can see some NULL bytes, just before the NT_HEADER, in our case, 0x80 bytes from the beginning of the file. This portion of memory is known as the RICH header.
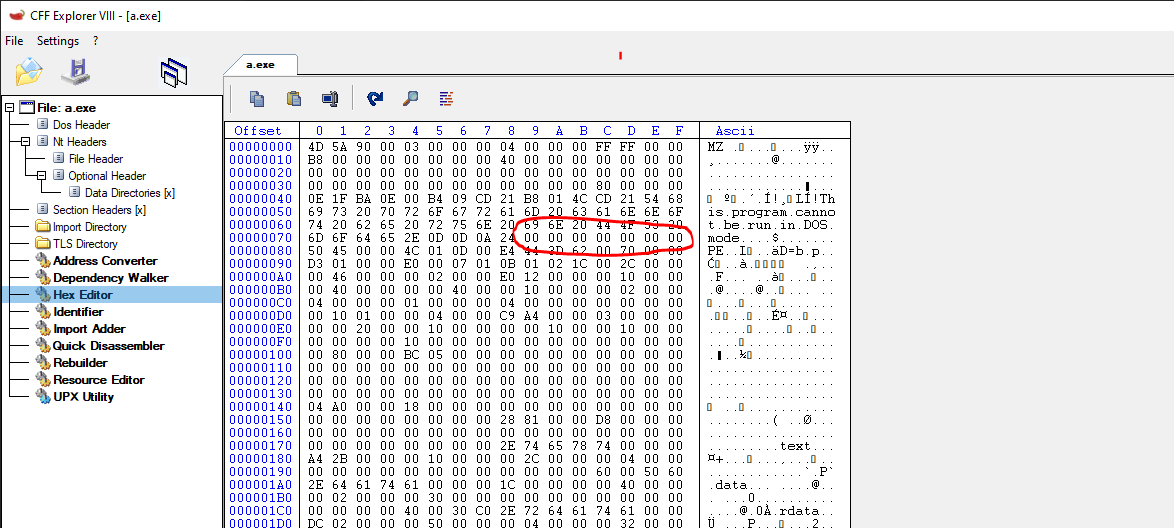
This header is only populated when the Microsoft Visual Studio suite was used to build the binary. It will contain information about the Tools and versions used. it also can be used as a way to misguide the author of the program https://securelist.com/the-devils-in-the-rich-header/84348/
NT HEADER
As mentioned before, if we follow the structure up to the 0x3x offset where the e_lfanew field is located, we will find the value of the offset to the NT_HEADER, the next header in the PE format. This header is part of winnt.h, it’s found under IMAGE_NT_HEADERS. Keep in mind that we are using 32-bit-executables in our example, but if you work on 64-bit, this header will be called NT_HEADERS64, but the structure will be the same. They are also known as PE32 (32-bit) and p32+ (64-bit)
IMAGE_NT_HEADERS
typedef struct _IMAGE_NT_HEADERS {
  DWORD                   Signature;
  IMAGE_FILE_HEADER       FileHeader;
  IMAGE_OPTIONAL_HEADER32 OptionalHeader;
} IMAGE_NT_HEADERS32, *PIMAGE_NT_HEADERS32;
Listed above is the structure of the header. The first field corresponds to the PE Signature. This value it’s a DWORD (4 bytes) and should always be “PE” (0x50 and 0x45 in hex) followed by 2 NULL bytes. We can see them in our binary.
The second field corresponds to another structure, the FILE_HEADER, followed by the OPTIONAL_HEADER. Let’s take a look at these ones. I’m more detailed since they provide a lot of information that can be useful to us.
FILE_HEADER
https://docs.microsoft.com/en-us/windows/win32/debug/pe-format#coff-file-header-object-and-image
Let’s start with the FILE_HEADERThis header Contains a standard Common Object File Format header (COFF), which holds information about the PE.
typedef struct _IMAGE_FILE_HEADER {
  WORD  Machine;
  WORD  NumberOfSections;
  DWORD TimeDateStamp;
  DWORD PointerToSymbolTable;
  DWORD NumberOfSymbols;
  WORD  SizeOfOptionalHeader;
  WORD  Characteristics;
}
The fields on the structure can be summarized as follow:
- Machine: contains the value of the type of architecture that can run the executable. For x86, the value is 0x14c
- NumberOfSections: The number of sections in the PE. This is good information since we can have an idea of how the PE is structured. It indicates the size of the table, which is followed right after the NT_HEADER
- TimeStamp: Universal Time representation of the creation date of the PE
- PointerToSymbolTable : Pointer to the symbols table (self explanatory)
- NumberOfSymbols : (self explanatory)
- SizeOfOptionalHeader : self explanatory
- Characteristics: It’s a flag field that can be combined to provide info for the binary. As an example, if the flag 0x2000 is set, this will indicate that the file is a DLL https://docs.microsoft.com/en-us/windows/win32/api/winnt/ns-winnt-image_file_header
OPTIONAL_HEADER
The image optional header is a bigger struct and holds relevant information for the binary to properly load and run. The size of this struct is not fixed, and it will depend on how the binary was programmed and compiled. In 32-bit, the struct has 31 members. We can see how it is constructed below:
typedef struct _IMAGE_OPTIONAL_HEADER {
  WORD                 Magic;
  BYTE                 MajorLinkerVersion;
  BYTE                 MinorLinkerVersion;
  DWORD                SizeOfCode;
  DWORD                SizeOfInitializedData;
  DWORD                SizeOfUninitializedData;
  DWORD                AddressOfEntryPoint;
  DWORD                BaseOfCode;
  DWORD                BaseOfData;
  DWORD                ImageBase;
  DWORD                SectionAlignment;
  DWORD                FileAlignment;
  WORD                 MajorOperatingSystemVersion;
  WORD                 MinorOperatingSystemVersion;
  WORD                 MajorImageVersion;
  WORD                 MinorImageVersion;
  WORD                 MajorSubsystemVersion;
  WORD                 MinorSubsystemVersion;
  DWORD                Win32VersionValue;
  DWORD                SizeOfImage;
  DWORD                SizeOfHeaders;
  DWORD                CheckSum;
  WORD                 Subsystem;
  WORD                 DllCharacteristics;
  DWORD                SizeOfStackReserve;
  DWORD                SizeOfStackCommit;
  DWORD                SizeOfHeapReserve;
  DWORD                SizeOfHeapCommit;
  DWORD                LoaderFlags;
  DWORD                NumberOfRvaAndSizes;
  IMAGE_DATA_DIRECTORY DataDirectory[IMAGE_NUMBEROF_DIRECTORY_ENTRIES];
}IMAGE_OPTIONAL_HEADER32, *PIMAGE_OPTIONAL_HEADER32;
We can see the different fields of the OPTIONAL_HEADER structure and that it provides a lot of information about the executable to the OS. We will check the most relevant fields to us now, but I will encourage everyone to take a look at them because it can help us a lot to understand how the binary runs in memory and where it gets its initial information. Some of these fields are:
- Magic: The state of the image file, executable, ROM, Architecture (x86, x64)
- AddressOfEntryPoint: This is interesting since it provides the Relative Virtual Address to the first instruction of the binary itself.
- ImageBase: This is the preferred load address of the binary. If there is no collision, the binary will try to load at this address, so all the Relative Addresses will be an offset to this base address. This is important information for us.
- SizeOfimage: The size in bytes of the image
- SizeOfHeaders : The size of the headers
- DLLCharacteristics: it’s a flag field. For example, the 0x0400 value will indicate if SEH (structure exception handlers) can be called
- DataDirectory: is an array part of the DATA_DIRECTORY struct. We will need to investigate this deeper since it’s crucial to the PE format
DATA_DIRECTORY
As we mentioned above, the DataDirectory array is part of the DATA_DIRECTORY struct, and the size of this array is determined by the IMAGE_NUMBEROF_DIRECTORY_ENTRIES value in winnt.h, if we look at the source code of MinGW, we can see that this value is fixed to 16, so we can take note of this. https://github.com/Alexpux/mingw-w64/blob/master/mingw-w64-tools/widl/include/winnt.h

This is how the DATA_DIRECTORY struct is defined:
typedef struct _IMAGE_DATA_DIRECTORY {
  DWORD VirtualAddress;
  DWORD Size;
} IMAGE_DATA_DIRECTORY, *PIMAGE_DATA_DIRECTORY;
The DataDirectory is data in the sections of the PE file. This can have different information that the loader needs to start the binary, one of the most significant is the Import Table, or IAT for Import Address Table, which holds all the functions and modules that the binary needs to load in order to run https://docs.microsoft.com/en-us/windows/win32/debug/pe-format#optional-header-data-directories-image-only
Import Address Table IAT
As mentioned above, this structure holds the address of the functions needed for the binary to load and run. This address is resolved in runtime since their original value is the RVA to the function inside the needed module. Once the binary is executed, this address is resolved and populated in the IAT
Section Table or Section Headers
typedef struct _IMAGE_SECTION_HEADER {
  BYTE  Name[IMAGE_SIZEOF_SHORT_NAME];
  union {
    DWORD physical address;
    DWORD VirtualSize;
  } Misc;
  DWORD VirtualAddress;
  DWORD SizeOfRawData;
  DWORD PointerToRawData;
  DWORD PointerToRelocations;
  DWORD PointerToLinenumbers;
  WORD  NumberOfRelocations;
  WORD  NumberOfLinenumbers;
  DWORD Characteristics;
} IMAGE_SECTION_HEADER, *PIMAGE_SECTION_HEADER;
This table is located right after the OPTIONAL HEADER, this is required due to the fact that the FILE_HEADER does not have a pointer to the section table, and it calculates the location of the Section Table with an offset from the last byte of the FILE_HEADER. each entry on the table represent the structure listed above which will be roughly about 40 bytes Some important information we can use from some fields are:
- Name: The name of the section (.text, .data, etc)
- VirtualSize: Size of the section when loaded in memory
- VirtualAddress: The address of the first byte of the section loaded in memory
- SizeOfRawData: The size of the data of the binary (.data section)
- RawAddress: The offset from the beginning of the PE to the .data section
- Characteristics: Again, another flag field, this time, it will determine the permissions of the section, for example, EXEC ONLY, READ ONLY, WRITE AND READ section, etc
SECTIONS
Sections are regions of memory that contain the actual code or data needed to execute the binary. So far, none of the fields in the headers that we take a look at containing actual code, only references, and information. The section does contain code and information used during execution. This section starts at the end of the headers section and can have different names. Some of them are reserved. https://docs.microsoft.com/en-us/windows/win32/debug/pe-format#special-sections
typedef struct _IMAGE_SECTION_HEADER {
    BYTE    Name[IMAGE_SIZEOF_SHORT_NAME];
    union {
            DWORD   physical address;
            DWORD   VirtualSize;
    } Misc;
    DWORD   VirtualAddress;
    DWORD   SizeOfRawData;
    DWORD   PointerToRawData;
    DWORD   PointerToRelocations;
    DWORD   PointerToLinenumbers;
    WORD    NumberOfRelocations;
    WORD    NumberOfLinenumbers;
    DWORD   Characteristics;
} IMAGE_SECTION_HEADER, *PIMAGE_SECTION_HEADER;
Above is a representation of this structure which has different fields. We can observe them in CFF explorer also:

https://docs.microsoft.com/en-us/windows/win32/debug/pe-format#section-flags
Some of the sections presented in an unpacked PE executable to keep in mind are:
- .text: the section where the code of the program and usually only read and execute permissions
- .data: in this section, we can find initialized data
- .rdata: Contains “read-only” initialized data
- .idata: this section contains the imported tables
- .tls: Thread Local Storage
With this, we covered a summarized version of how the PE is formed and information about the sections. We will now try to use the information that we just learned to better understand how a binary is “packed” and how we can create a program that performs something similar to a packer that allows us to either obfuscate or create code inside the binary, this is because we are trying to get a Malware Analysis approach to the subject.
Packed binaries
What is a packed binary?
A packed binary can be referred to as an executable file that is compressed or altered from its original state and is able to execute normally in memory. A “packed binary” it’s usually built from a “runtime packer,” which we will refer to as a “packer.”
Packers are known for compression since they were known for trying to compress the size of the binary itself on disk but preserve the execution. These techniques are usually known as “Executable Compression” the idea is that a file can combine compressed data with a decompression code in the same executable, so as described above, it can remain compressed on disk but executed properly in memory.
The latter is commonly used for malware to “hide itself” from Anti Virus Solutions or other threat detections mechanism from software installed in the computer or analyzing the traffic on the network. So we will see those packers are very popular in Malware programs for that exact reason.
We will take a look at a packed binary. We will pack and modify the structure of the files in order to understand how this information can help us not only to create packed binaries but also to unpack an already obfuscated or compressed binary.
Packing binaries
Packing a binary with UPX
https://github.com/upx
Before we start analyzing packed binaries lets, try ourselves to first pack the binary we just created. For that, I will rename the a.exe binary to unpacked.exe also, let’s create a copy of the same program to pack, and let us call it upx_packed.exe
Great, now let’s start by looking at how we will pack the binary. As the title of this section says, we will use UPX.
The “Ultimate Packer for Executables” or UPX https://upx.github.io/ is a free executable packer for several formats.
We can download the upx executable for windows from here https://github.com/upx/upx/releases/tag/v3.96. And we can add it to our environment variables, or we can just copy it to the directory we are working on.
Now let’s execute it with the following command, and let’s analyze what changes were made to the binary.
Execute:
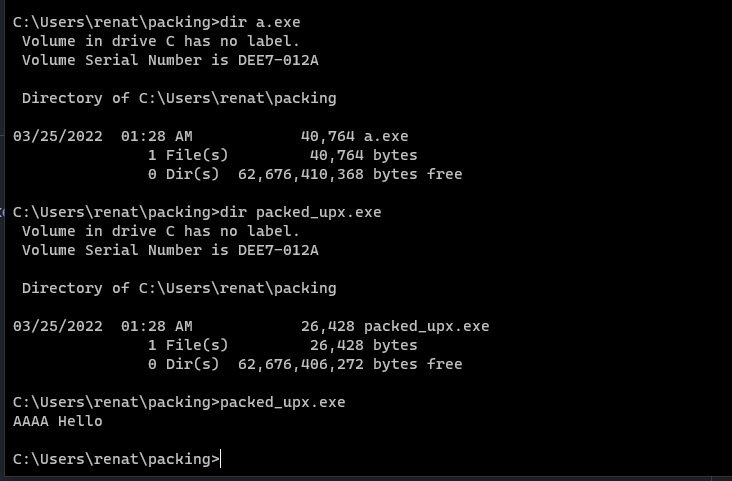
$upx packed_upx.exe
With this, the file will be packed. You can check if the size of the new packed_upx.exe file is smaller than the original. This is due to the compression that UPX applies, and if you execute it, it works properly.
Let’s take a look now at the binary itself and see if we can spot more differences.
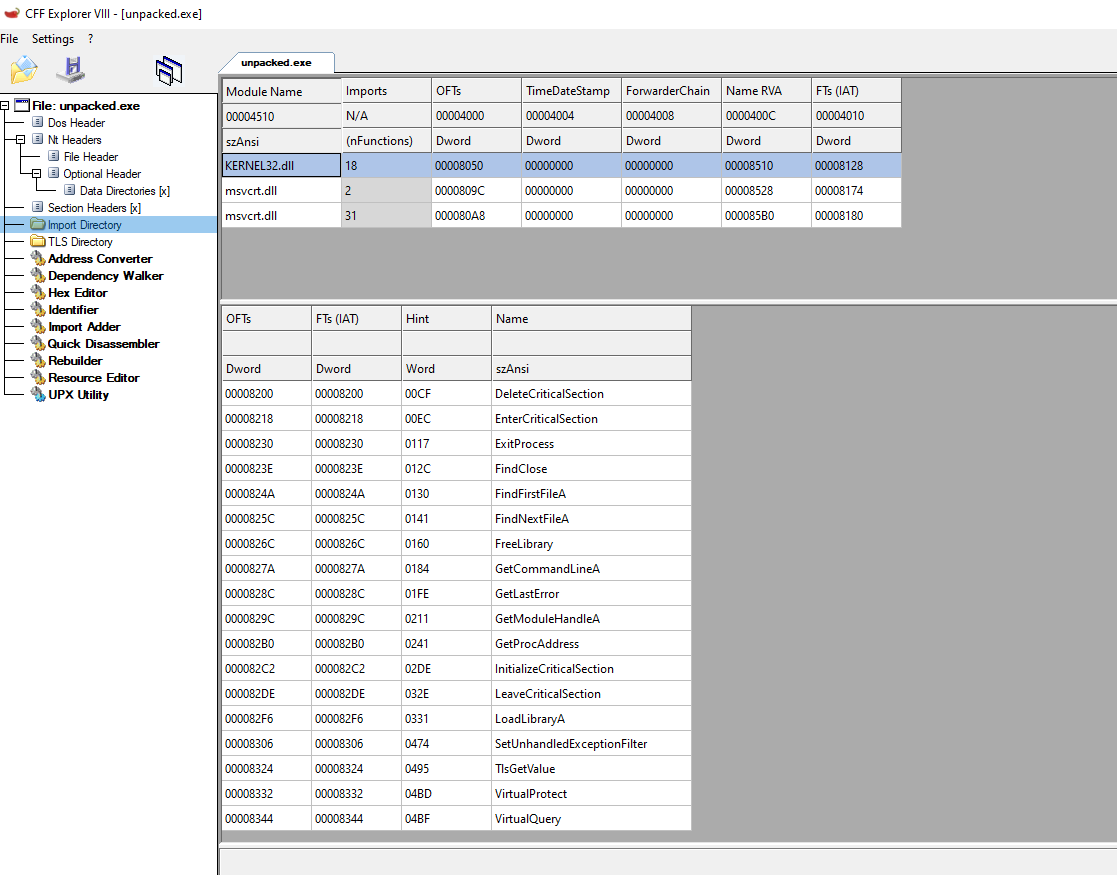
unpacked.exe:

packed_upx.exe:
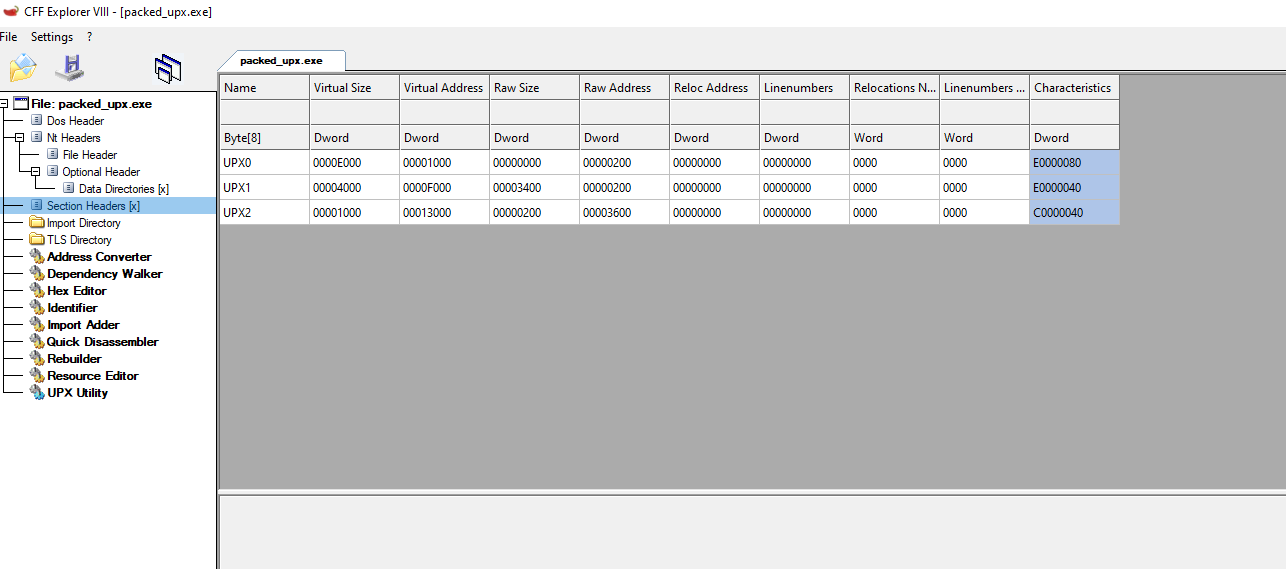
The common sections that we saw before in the now unpacked.exe are replaced for 3 sections UPX0, UPX1 UPX2, in the packed_upx.exe binary that shows us how the data is changed inside the binary and in the regular structure itself.
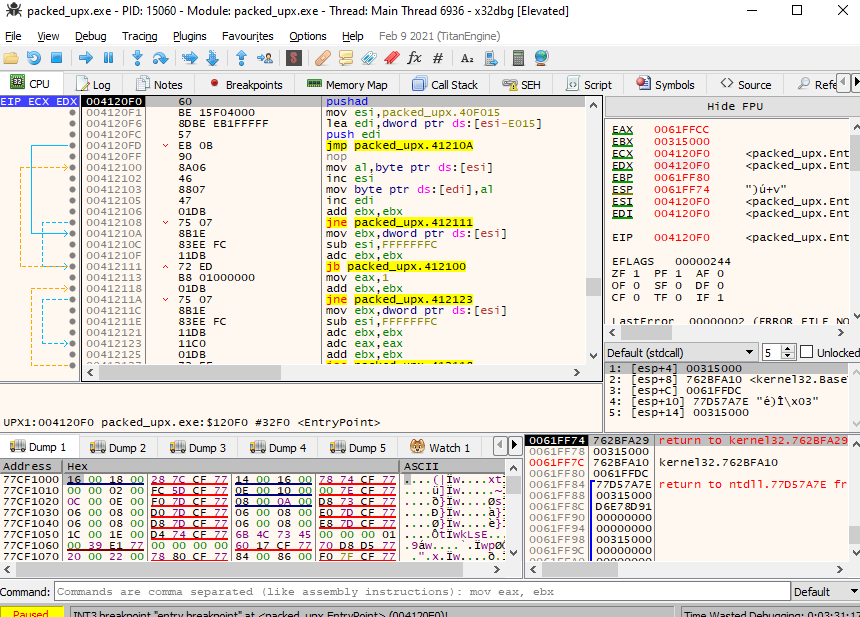 Above also, the entry point of the binary in x32dbg in runtime looks totally different, and it also changes
unpacked.exe:
Above also, the entry point of the binary in x32dbg in runtime looks totally different, and it also changes
unpacked.exe:
packed_upx.exe:
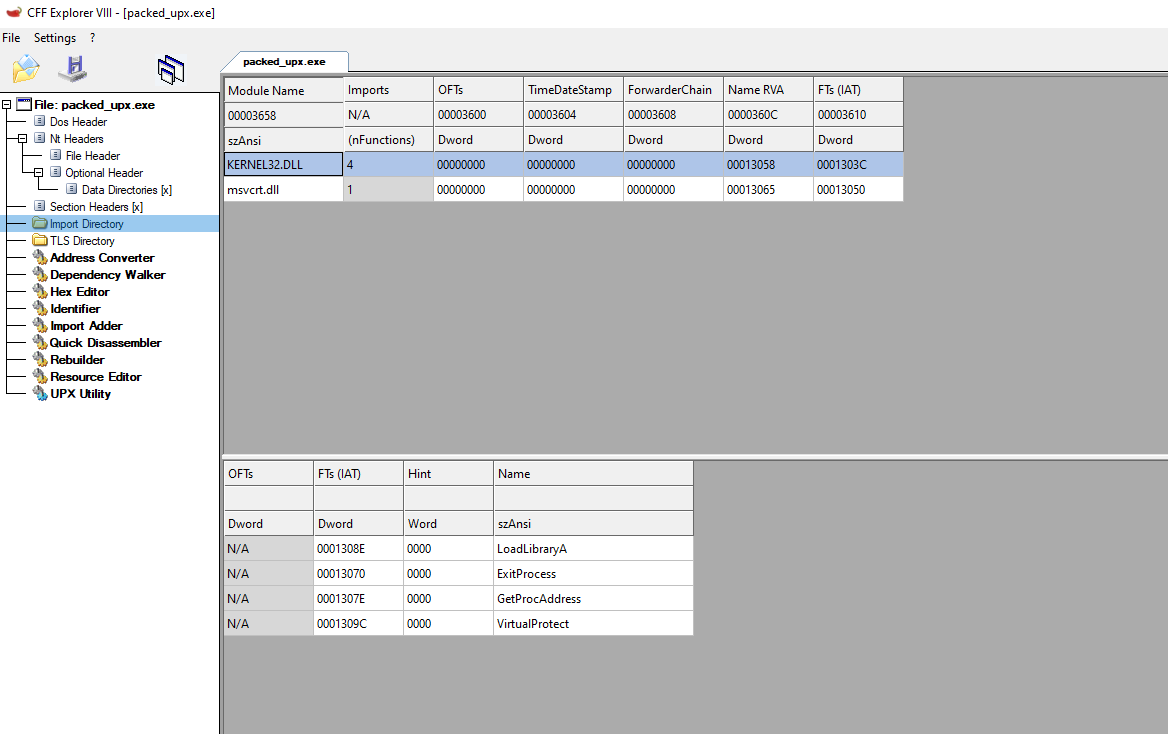
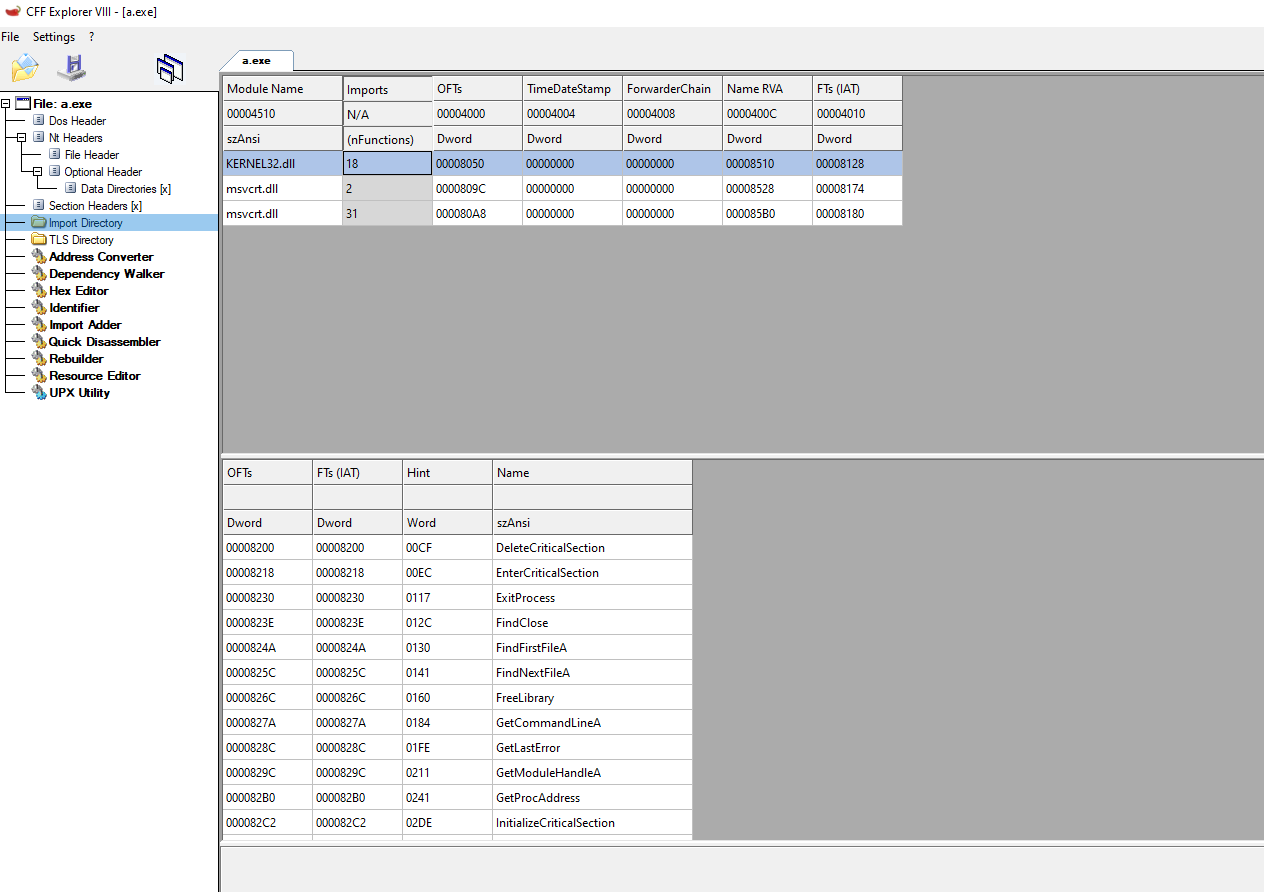
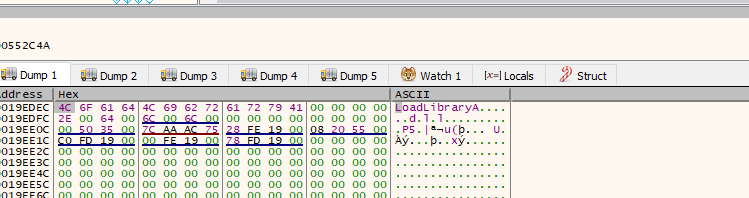
Finally, listed above, you can see that there’s also a difference between the number of functions called from different DLLs. There is much more in the original file than in the compressed one. This is because the packer, which compresses the file, will try to load everything that it needs with the least amount possible of API calls. This is, in the case of UPX, to effectively reduce the size of the binary.
This is interesting since LoadLibraryA will allow you to load a module and GetProcAddress to resolve the address of a given function, so the packer can start resolving the function that it will use. This can explain why there are only a few functions being imported and the reason behind it.
https://docs.microsoft.com/en-us/windows/win32/api/libloaderapi/nf-libloaderapi-getprocaddress https://docs.microsoft.com/en-us/windows/win32/api/libloaderapi/nf-libloaderapi-loadlibrarya
Creating a Simple “packer” (more like a “patcher”) in python
In order to better understand how a packer can manipulate an executable outside of compression, let’s create a simple packer in python that will help us to accomplish our goal. Just modify a binary and test it. The packer will create a section with some bytes and then write code to the executable and redirect execution there. We will not apply compression, or we will try to not modify the original code yet. This is just to show how we can pack some data or modify existing one into an executable
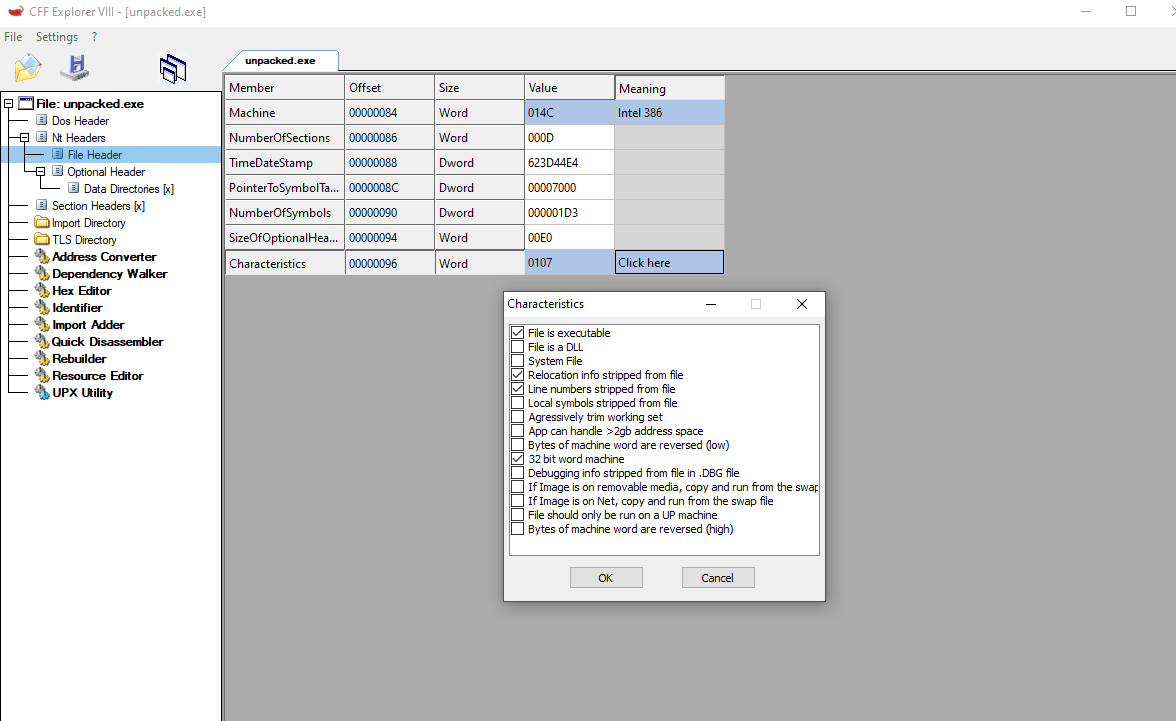
We now also know that ASLR should be disabled on the binary since we compiled with the “-no-pie” flag, but we can still check this out. If the flag IMAGE_FILE_RELOCS_STRIPPED un Characteristics is set to 0x0001, ASLR should be disabled for the binary. We can verify this on CFF explorer.
Great, also we will use for this section the pefile python module, which will allow us to parse information from the PE structures and also modify them. You can install it with the command:
pip install pefile
https://github.com/erocarrera/pefile
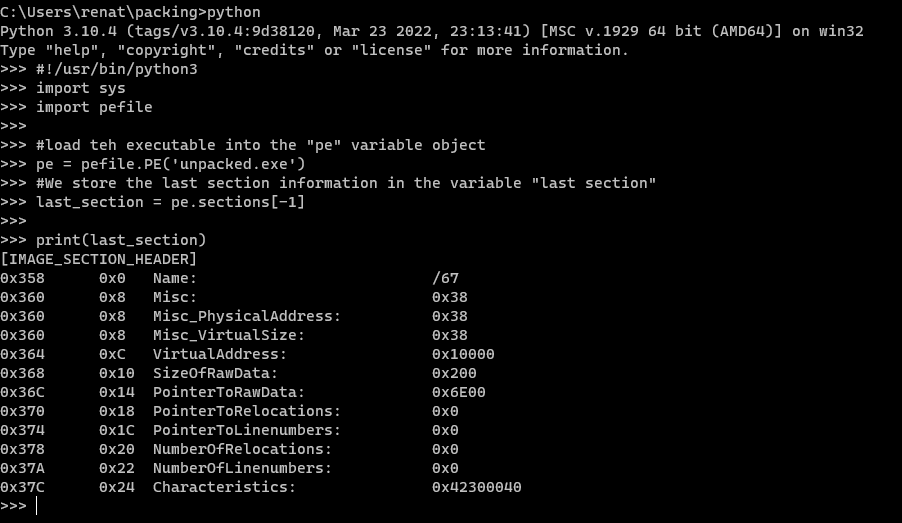
Great, to test how it works, let’s read all the data from the executable to a variable and then check the last section of the binary. Let’s use the following code:
#!/usr/bin/python3
import sys
import pefile

#load the executable into the "pe" variable object
pe = pefile.PE('unpacked.exe')
#We store the last section information in the variable "last section."
lastSection = pe.sections[-1]

print(lastSection)
When executed, we can see the results:
And we can cross reference them with the information on CFF Explorer.
Great, the pefile module works. We can learn more about what we can do with this module in their documentation https://github.com/erocarrera/pefile/blob/wiki/UsageExamples.md#introduction
So now the question remains, What can we build in order to “pack” this binary? We could encode or rename a section, but to do something more interactive and simple, let’s just create a “packed section” and inject some code there that will execute before the binary executes itself. This sounds nothing to do with packers, but it will simplify the fact of building a proper packer tool. Instead, let’s have more of the “hacker” approach. With this in consideration, let’s then try to execute the following.
- Create a new section in the binary
- Redirect the entry Point Address to our created section
- Execute our payload
- Return to normal execution
Ok, we have our objectives. Let’s start by creating our new section where we will jump after modifying the entry point. Remember, the whole idea is just to create simple packing proof of concept. Also, let’s now set our newly created section after the last section in the binary that we identified under “lastSection.”
We can accomplish that with the following code:
#!/usr/bin/python3
import sys
import pefile

#load the executable into the "pe" variable object
pe = pefile.PE('unpacked.exe')
#We store the last section information in the variable "last section."
lastSection = pe.sections[-1]

#Create a new section header in a variable
newSection = pefile.SectionStructure(pe.__IMAGE_SECTION_HEADER_format__)
#fill the new section with NULL bytes
newSection.__unpack__(bytearray(newSection.sizeof()))
#setting in place our newSection
newSection.set_file_offset(lastSection.get_file_offset() + lastSection.sizeof())
Let’s now set our newly created section after the last section in the binary that we identified under “lastSection” we will name this section as “.packed .”But also, before that, we need to address an issue. At this point, if we add the new section, it will not be displayed under sections. This is because the sections depend on the NumberOfSections field in the FILE_HEADER. So we need to add 1 to the current value on it before writing this to the file. So let’s code this and write this to an executable, we will read from the “unpacked.exe” file, and we will write to a new file that we will call “packed_python.exe”:
#!/usr/bin/python3
import sys
import pefile

#load the executable into the "pe" variable object
pe = pefile.PE('./unpacked.exe')
#We store the last section information in the variable "last section."
lastSection = pe.sections[-1]

#Create a new section header in a variable
newSection = pefile.SectionStructure(pe.__IMAGE_SECTION_HEADER_format__)
#fill the new section with NULL bytes
newSection.__unpack__(bytearray(newSection.sizeof()))
#setting in place our newSection
newSection.set_file_offset(lastSection.get_file_offset() + lastSection.sizeof())
#Set a name for the section, in this case ".packed"
newSection.Name = b".packed"# we need to pass as bytes
# increase number of sections
pe.FILE_HEADER.NumberOfSections += 1
#We also had the following two lines to write the new sections to our pe object
pe.sections.append(newSection)
pe.__structures__.append(newSection)

#write the modified pe to an executable file on disk
pe.write('./python_packed.exe')

The execution looks clean, and the python_packed.exe file was created. We can explore the binary with CFF again to see if we managed to modify the PE.
Listed above appears the new section created named “.packed”. But when we try to execute the newly created file, we receive an error that the file cannot be run in put PC

Why does this happen? The new section we created has no values in any field of the section. We need to populate the permissions. Let’s set Execute, Read and Execute permissions. That way, later we can try to execute shellcode we can add these values, in order to that we need to set the flags for the Characteristics Field of the sections header to match the .text section, so we need to set the flags IMAGE_SCN_CNT_CODE, IMAGE_SCN_MEM_EXECUTE, IIMAGE_SCN_MEM_READ. We can search for these values in the microsoft documentation and then add them to the new section https://docs.microsoft.com/en-us/windows/win32/debug/pe-format#section-flags
newSection.Characteristics = 0x40000000 | 0x20000000 | 0x20 # IMAGE_SCN_MEM_READ | IMAGE_SCN_MEM_EXECUTE | IMAGE_SCN_CNT_CODE
Now we also need to set the Values for the Misc, Physical Address, and VirtualSize fields. Let’s set them to an arbitrary 0x100 size https://stackoverflow.com/questions/35685589/how-do-i-make-space-for-my-code-cave-in-a-windows-pe-32bit-executable
newSection.Misc = 0x100
newSection.Misc_PhysicalAddress = 0x100
newSection.Misc_VirtualSize = 0x100
Next, the section Virtual Address needs to be set. Since we can parse the fields in the lastSection variable object, let’s add to his virtual address and use the following function to calculate the proper size for the Virtual address, the code it’s self-explanatory.
#This is a function to properly align the size of the new section we are adding
def alignSectionSize(size, align):

  if size % align == 0:
    value = size
  else:
    value = ((size+align) // align) * align
  return value
With this in consideration, let’s add it to the newSection object Variable:
newSection.VirtualAddress = lastSection.VirtualAddress + alignSectionSize(lastSection.Misc_VirtualSize, pe.OPTIONAL_HEADER.SectionAlignment)
Finally, we can set the SizeOfImage this time, we will pass as an argument the 0x100 value chosen before for the VirtualSize. We are ready to write these changes and test if the binary can now execute.
pe.OPTIONAL_HEADER.SizeOfImage += alignSectionSize(0x100, pe.OPTIONAL_HEADER.SectionAlignment)
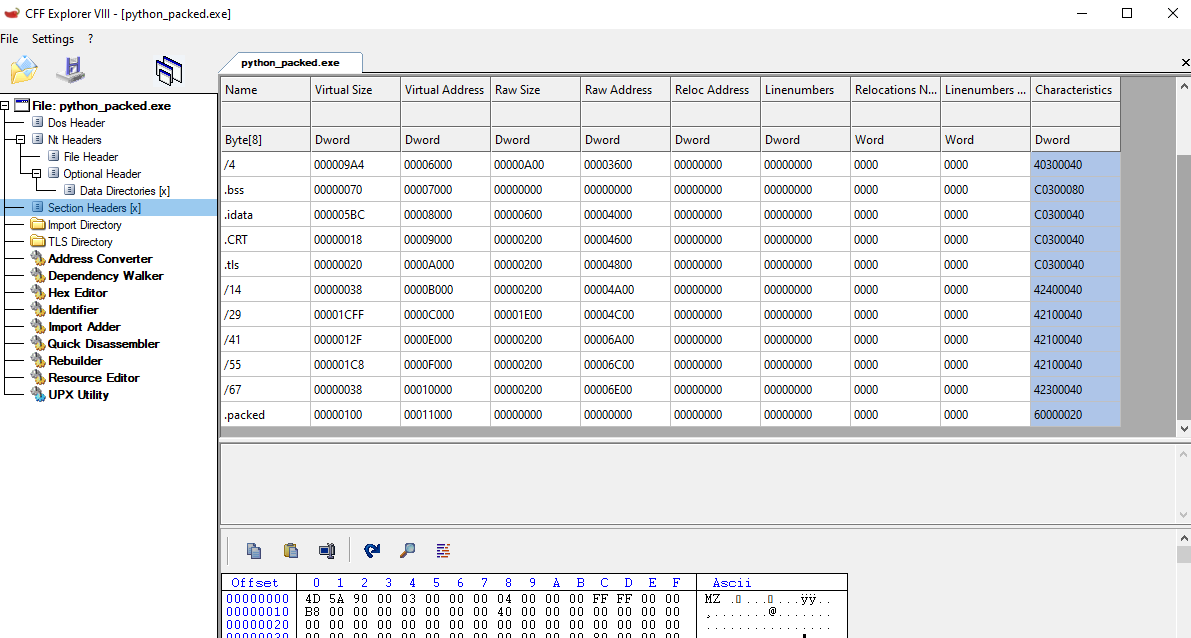
The program executes cleanly, and the packed binary is created and also executes properly as you can see in the following image:
Also, If we open the newly created binary in CFF, we can see that the sections were set as we planned.
So our POC works, we can modify the PE, but we only added a section, and we still need to redirect the execution of the program. We could overwrite The section in .text where on the Entry Point we previously identified, but why don’t we just overwrite the value in the “AddressOfEntryPoint” field? This should redirect the execution.
We know the entry point of the program since we can parse the AddressOfEntryPoint field in the OPTIONAL_HEADER. We know that this value is the Relative Address to the ImageBase, which we can also Obtain from the ImageBase Field also in the OPTIONAL_HEADER. Let’s add those values and prints to the program in case we need to follow the flow of execution.
#Getting the value of the ImageBase into a variable
imageBase = pe.OPTIONAL_HEADER.ImageBase
print(f"[*] Imagebase = {hex(imageBase)}")
#Getting the value of the AddressOfEntryPoint into a variable
pe_oep = pe.OPTIONAL_HEADER.AddressOfEntryPoint
print(f"[*] AddressOfEntryPoint = {hex(pe_oep)}")
#Calculate the entrypoint in execution
exec_ep = imageBase+pe_oep
print(f"[*] Entry Point in Execution = {hex(exec_ep)}")
Listed above, we can find the values of ImageBase and AddressOfEntryPoint were set to a variable. We can calculate in the exec_ep variable the value of the Original Entry Point in memory since we compile the binary with -no-pie flag.
Since when the no relocation flag was, set, we know that this address will be fixed, but still, let us check it out in a debugger. We need to pass some exceptions until we reach the INT3 breakpoint for Entry Point. As you can see below, the entry point matches. So we now know how to obtain the address of the entry point and now let’s modified to point out our code
Now let’s modify the Entry point and print it to see if we have the same result in our analysis. Keep in mind that we need to calculate the SizeOfRawData first, and we can accomplish this by using our alignment function to obtain the size we should use in the field.
We can code the above like this:
#in order to write, we need to align the SizeofRawData of the section
newSection.SizeOfRawData = alignSectionSize(0x100, pe.OPTIONAL_HEADER.FileAlignment)
#redirect the entry point to the beginning of our newly created section
#first let's set the address Of entry point to point to our new section
pe.OPTIONAL_HEADER.AddressOfEntryPoint = newSection.VirtualAddress
# let's save the ep in the new_ep variable
new_ep = pe.OPTIONAL_HEADER.AddressOfEntryPoint + imageBase
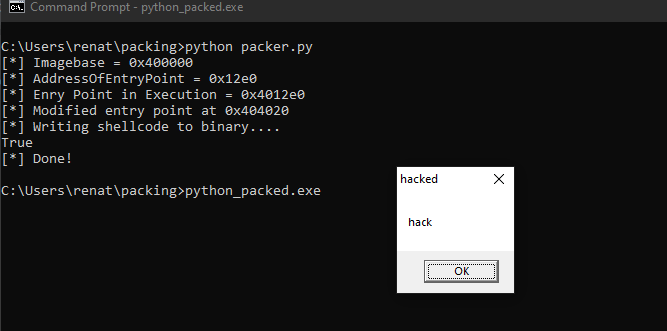
print(f"[*] Modified entry point at {hex(new_ep)}")
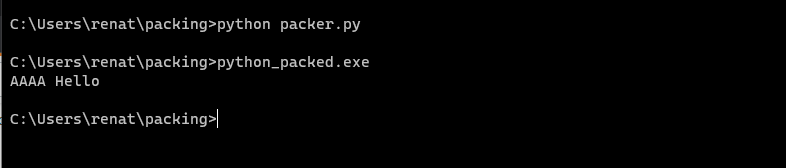
After execution, we see the code is executed correctly, and it displays the address 0x411000
And when dynamically analyzing in the debugger, we see above that the entry point matches the patched Entry Point address. We were able to redirect the code execution to the executable.
Creating a simple shellcode
Since we are testing the “packer” to see if it can hide malicious code, let’s start by creating a payload in the form of a shellcode that can help us to execute something. Let’s try to pop up a window with a message. For this, we will create the shellcode in a separate file to just print it and copied into our payload. You can obviously use something to generate the payload. In my case, I will use a python script to compile the instructions. There’s no room on this post to properly explain shellcode, you could also create compiled code and use it, but this is something to make it easy also. Shellcoding is always a good exercise. You can use the shellcode from this post or try one yourself. https://www.corelan.be/index.php/2010/02/25/exploit-writing-tutorial-part-9-introduction-to-win32-shellcoding/
import struct
from keystone import *
import sys
from capstone import *

code = (
'''  Write assembly instruction here in strings, as the example:
"mov eax, edx     ;"
"pop eax           ;"
'''
)

ks = Ks(KS_ARCH_X86, KS_MODE_32)

opcodes = ks.asm(code)

sh = b""
for e in opcodes[0]:
    sh += struct.pack("B",e)

shellcode = bytearray(sh)

md = Cs(CS_ARCH_X86, CS_MODE_32)
for i in md.disasm(shellcode, 0x0):
    print("0x%x:\t%s\t%s\t%s" %  (i.address, i.bytes.hex(), i.mnemonic, i.op_str))

total_shellcode = ''.join("\\x%02x" % i for i in shellcode)
print("\nlenght of the shellcode = %d bytes\n" % len(total_shellcode) )
print(f'"{total_shellcode}"')
We can use the code above to create the shellcode. As I mentioned, I will not provide details on the shellcode creation. You can use this base script to create yours or use the raw bytes used in this post. They are Position Independent. It should work on your code. This is the generated shellcode you can use if you don’t want to code it:
"\x60\x89\xe5\x81\xc4\xf0\xf9\xff\xff\x31\xc9\x64\x8b\x71\x30\x8b\x76\x0c\x8b\x76\x1c\x8b\x5e\x08\x8b\x7e\x20\x8b\x36\x66\x39\x4f\x18\x75\xf2\xeb\x06\x5e\x89\x75\x04\xeb\x54\xe8\xf5\xff\xff\xff\x60\x8b\x43\x3c\x8b\x7c\x03\x78\x01\xdf\x8b\x4f\x18\x8b\x47\x20\x01\xd8\x89\x45\xfc\xe3\x36\x49\x8b\x45\xfc\x8b\x34\x88\x01\xde\x31\xc0\x99\xfc\xac\x84\xc0\x74\x07\xc1\xca\x0d\x01\xc2\xeb\xf4\x3b\x54\x24\x24\x75\xdf\x8b\x57\x24\x01\xda\x66\x8b\x0c\x4a\x8b\x57\x1c\x01\xda\x8b\x04\x8a\x01\xd8\x89\x44\x24\x1c\x61\xc3\x68\x83\xb9\xb5\x78\xff\x55\x04\x89\x45\x10\x68\x8e\x4e\x0e\xec\xff\x55\x04\x89\x45\x14\x31\xc0\x66\xb8\x6c\x6c\x50\x68\x33\x32\x2e\x64\x68\x75\x73\x65\x72\x54\xff\x55\x14\x89\xc3\x68\xa8\xa2\x4d\xbc\xff\x55\x04\x89\x45\x20\x31\xc0\x66\x05\x65\x64\x50\x68\x68\x61\x63\x6b\x89\xe2\x31\xc0\x50\x68\x68\x61\x63\x6b\x89\xe7\x50\x52\x57\x50\xff\x55\x20\x31\xc0\x05\xe0\x12\x40\x00\xff\xe0"
The created shellcode will pop a Message Box with the word “hacked” and then will redirect execution to the entry point. Now, let’s upgrade our python script to write these changes to the “python_packed.exe”.
#!/usr/bin/python3
import sys
import pefile

#This is a function to properly align the size of the new section we are adding
def alignSectionSize(size, align):

  if size % align == 0:
    value = size
  else:
    value = ((size+align) // align) * align
  return value

#load the executable into the "pe" variable object
pe = pefile.PE('./unpacked.exe')
#We store the last section information in the variable "last section"
lastSection = pe.sections[-1]

#Create a new section header in a variable
newSection = pefile.SectionStructure(pe.__IMAGE_SECTION_HEADER_format__)
#fill the new section with NULL bytes
newSection.__unpack__(bytearray(newSection.sizeof()))
#setting in place our newSection
newSection.set_file_offset(lastSection.get_file_offset() + lastSection.sizeof())
#Set a name for the section, in this case ".packed"
newSection.Name = b".packed"# we need to pass as bytes
# increase number of sections
pe.FILE_HEADER.NumberOfSections += 1

#set read executable permissions on the  new section
newSection.Characteristics = 0x40000000 | 0x20000000 | 0x80000000 | 0x20 # IMAGE_SCN_MEM_READ | IMAGE_SCN_MEM_EXECUTE |IMAGE_SCN_MEM_WRITE| IMAGE_SCN_CNT_CODE

#We set need to set the value of the Misc, Physical address and virtual size, I choose 0x100
newSection.Misc = 0x100
newSection.Misc_PhysicalAddress = 0x100
newSection.Misc_VirtualSize = 0x100

#add a proper size to VirtualAddress
newSection.VirtualAddress = lastSection.VirtualAddress + alignSectionSize(lastSection.Misc_VirtualSize, pe.OPTIONAL_HEADER.SectionAlignment)

#Calculate the value for the SizeOfImage header
pe.OPTIONAL_HEADER.SizeOfImage += alignSectionSize(0x100, pe.OPTIONAL_HEADER.SectionAlignment) #0x100 is the chosen value for the size of the section

#Getting the value of the ImageBase into a variable
imageBase = pe.OPTIONAL_HEADER.ImageBase
print(f"[*] Imagebase = {hex(imageBase)}")
#Getting the value of the AddressOfEntryPoint into a variable
pe_oep = pe.OPTIONAL_HEADER.AddressOfEntryPoint
print(f"[*] AddressOfEntryPoint = {hex(pe_oep)}")
#Calculate the entrypoint in execution
exec_ep = imageBase + pe_oep
print(f"[*] Entry Point in Execution = {hex(exec_ep)}")
#in order to write we need to align the SizeofRawData of the section
newSection.SizeOfRawData = alignSectionSize(0x100, pe.OPTIONAL_HEADER.FileAlignment)
newSection.PointerToRawData = pe.OPTIONAL_HEADER.AddressOfEntryPoint
#redirect the entry point to the beginning of our newly created section
#first let's set the address Of entry point to point to our new section
pe.OPTIONAL_HEADER.AddressOfEntryPoint = 0x4020 #entry point set to .data
# let's save the ep in the new_ep variable
new_ep = pe.OPTIONAL_HEADER.AddressOfEntryPoint + imageBase
print(f"[*] Modified entry point at {hex(new_ep)}")
#lets create a byte array where we can inject our shellcode
#payload = bytearray(newSection.SizeOfRawData)
#shellcode = b"\x90"*newSection.SizeOfRawData
#We also add the following to lines to write to disk
pe.sections.append(newSection)
pe.__structures__.append(newSection)

#copying MessagerBoxA shellcode that returns execution to the Original Entry Point
shellcode = b"\x90"*8
shellcode += b"\x60\x89\xe5\x81\xc4\xf0\xf9\xff\xff\x31\xc9\x64\x8b\x71\x30\x8b\x76\x0c\x8b\x76\x1c\x8b\x5e\x08\x8b\x7e\x20\x8b\x36\x66\x39\x4f\x18\x75\xf2\xeb\x06\x5e\x89\x75\x04\xeb\x54\xe8\xf5\xff\xff\xff\x60\x8b\x43\x3c\x8b\x7c\x03\x78\x01\xdf\x8b\x4f\x18\x8b\x47\x20\x01\xd8\x89\x45\xfc\xe3\x36\x49\x8b\x45\xfc\x8b\x34\x88\x01\xde\x31\xc0\x99\xfc\xac\x84\xc0\x74\x07\xc1\xca\x0d\x01\xc2\xeb\xf4\x3b\x54\x24\x24\x75\xdf\x8b\x57\x24\x01\xda\x66\x8b\x0c\x4a\x8b\x57\x1c\x01\xda\x8b\x04\x8a\x01\xd8\x89\x44\x24\x1c\x61\xc3\x68\x83\xb9\xb5\x78\xff\x55\x04\x89\x45\x10\x68\x8e\x4e\x0e\xec\xff\x55\x04\x89\x45\x14\x31\xc0\x66\xb8\x6c\x6c\x50\x68\x33\x32\x2e\x64\x68\x75\x73\x65\x72\x54\xff\x55\x14\x89\xc3\x68\xa8\xa2\x4d\xbc\xff\x55\x04\x89\x45\x20\x31\xc0\x66\x05\x65\x64\x50\x68\x68\x61\x63\x6b\x89\xe2\x31\xc0\x50\x68\x68\x61\x63\x6b\x89\xe7\x50\x52\x57\x50\xff\x55\x20\x31\xc0\x05\xe0\x12\x40\x00\xff\xe0"
#writing the shellcode to .data section
print("[*] Writing shellcode to binary....")
print(pe.set_bytes_at_offset(0x3020, shellcode)) #writing to recalculated offset size
#writing to disk
pe.write('./python_packed.exe')
print("[*] Done!")
Listed above is the code used to modify the binary. With what we have learned plus the comments, it should be easy to follow along, but basically, the script does this:
- Create a new section “.packed”
- Write a shellcode to “.data” + 0x20
- Change the entry point of the PE to “.data” + 0x20
- Executes shellcode on “.data”
- Return Execution to OEP (Original Entry Point)
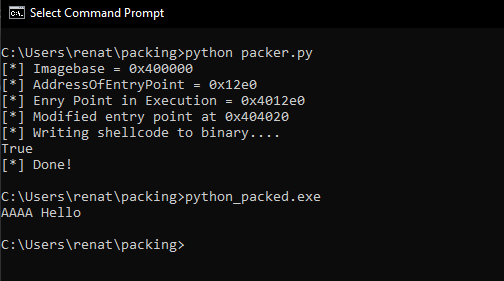
Great, above we can see that after executing the program, a MessageBox appears, and once we click on it, execution is redirected to the OEP, and the program continues normal execution.
If we think about what we did, we were able to totally change the executable code flow. Malware can do the same it can have encrypted data that will be decrypted during execution and then change the flow of execution to it, this way avoiding external defenses mechanism, like an EDR.
We could create one of those, but the main idea is to learn about unpacking, so you can give it a try. In the next sections, we will use this knowledge to start unpacking binaries.
Unpacking binaries
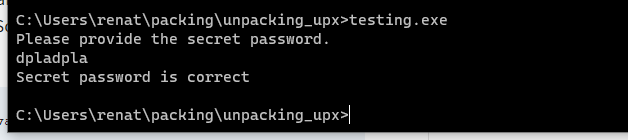
Now that we know how an executable is constructed and how packers work let’s try to unpack a upx binary. Let’s code another small C program. This time we will just ask for some user input in order to stop execution after we launch the program to avoid it closing itself.
This is the source code of the program.
#include <stdio.h>
#include <string.h>
#include <unistd.h>

int main(){
    char check[8]="dpladpla";
    char buf[8];

    puts("Please provide the secret password.");
    read(0, buf, 8);

    if(strncmp(buf, check, 8)==0){
        puts("Secret password is correct");
        return 0;
    }
    puts("Incorrect secret password\n");
    return 1;
}
We can compile it with
GCC -fno-pie testing.c -o testing
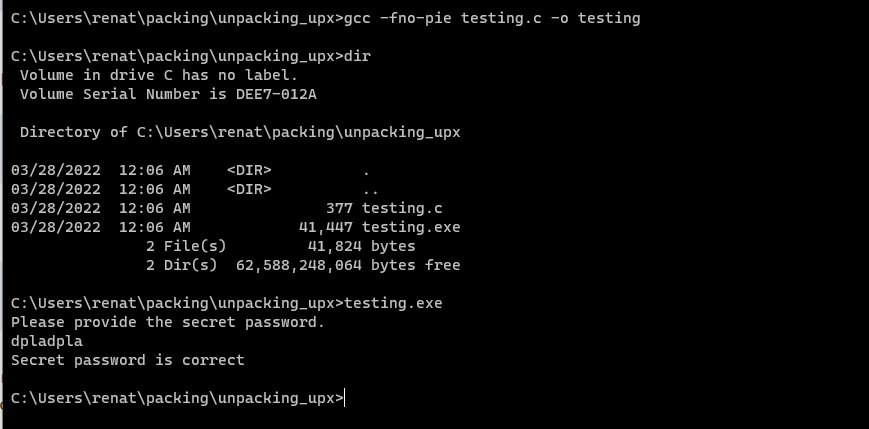
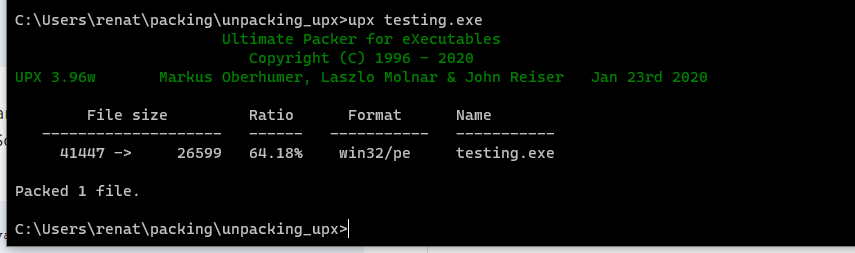
We can test it’s working by simply executing it as shown above. Now that we know that our program works, let’s create a backup copy and pack it using upx with the following command:
upx testing.exe
First, we can confirm that our binary works by just executing it.
UPX unpack
Let’s now pack the just created “testing.exe” binary using UPX, and let’s analyze this binary. Remember we can pack it using the upx binary and exe
No issues seem to appear, so we can now check how the binary is being altered, and the sections have been renamed to UPX0, UPX1, and UPX3. This time we will use IDA to check the segments. We can do it by going to view -> segments. We will use IDA because we will start to apply more Reverse Engineering from now on.

Also, if we look at the code, we cannot identify the usual Entry Point or functions. As an example below, we will contrast how the code looks in the backup with no UPX packing and with packing.
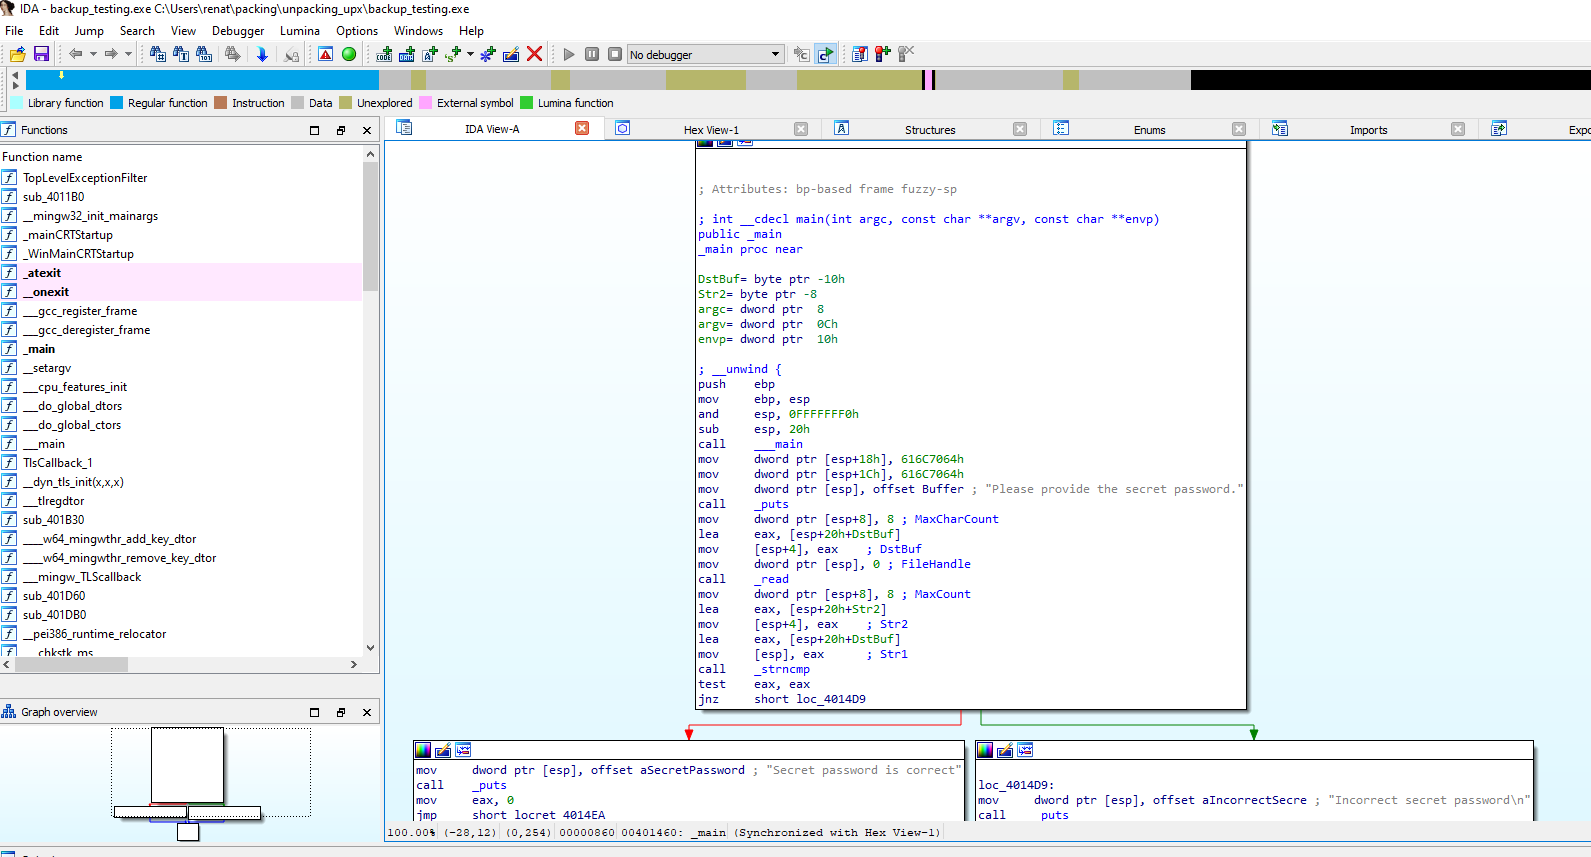
Listed above, we can see how the main functions and the assembly code of the binary look normal.
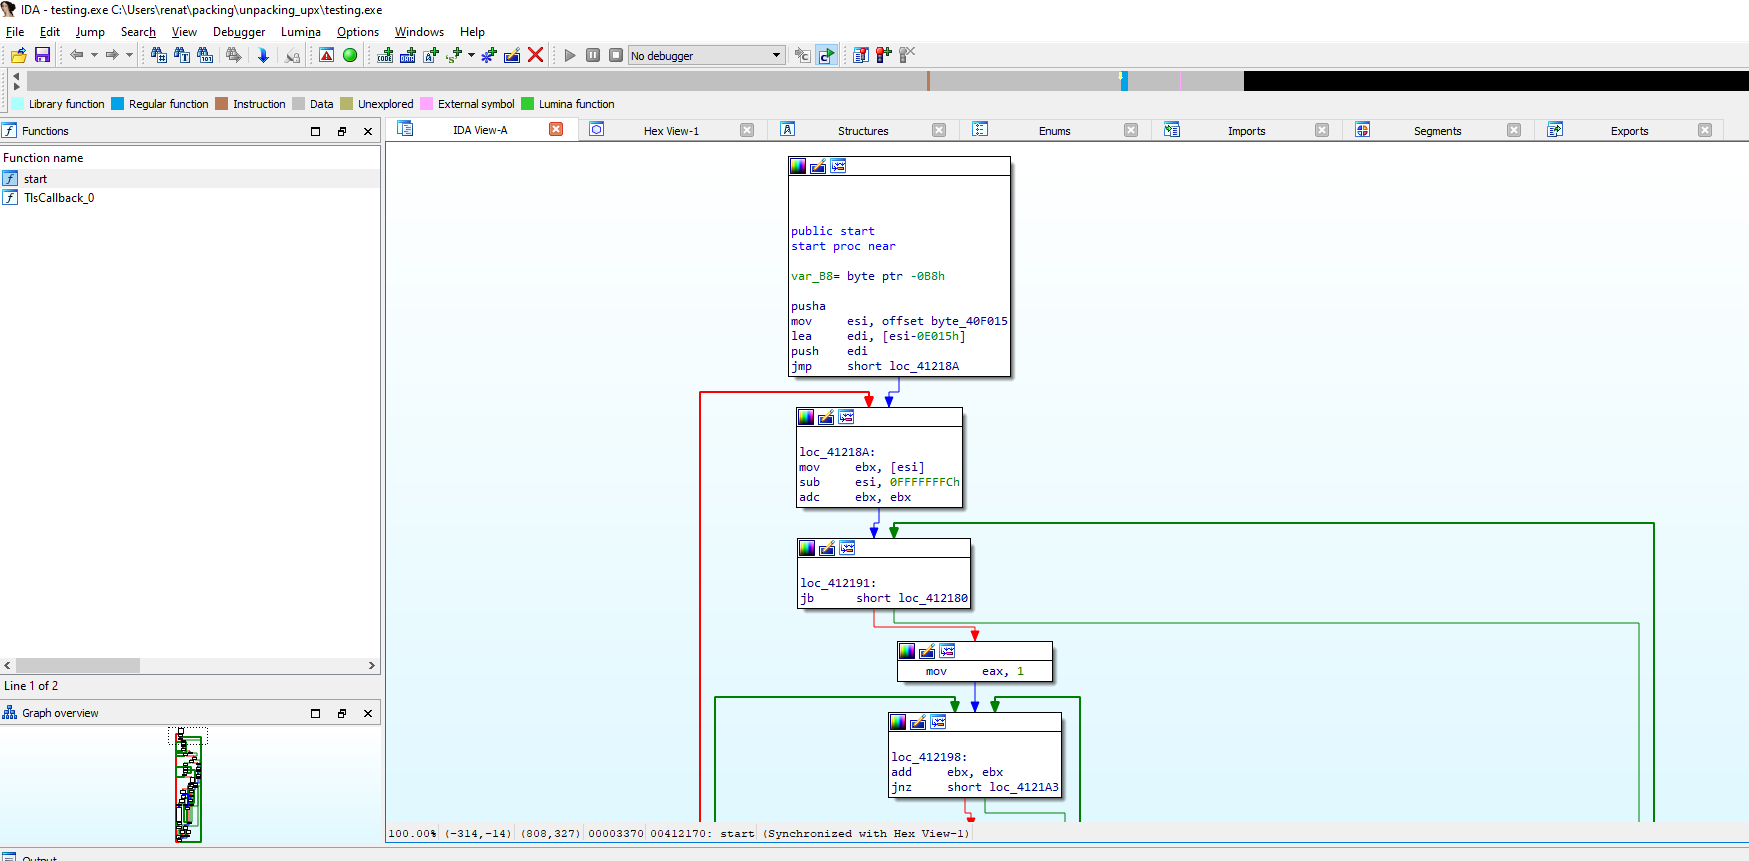
While above, we can clearly see the code has changed, and it looks more difficult to follow or spot.
This is why packing is so used in Malware Analysis. Even commercial packers can complicate the reverse engineering process. Now we will take a look at how to unpack this binary.
In order to unpack this binary, we can use UPX and just throw this command.
upx -d testing.exe
But since we want to investigate deeper, let’s see if we can spot the unpacked binary and if we can “unpack” it not relaying on the upx solution.
Manually unpacking UPX binary
For this section, we will use x32dbg Since we will dynamically analyze the binary, let’s first open up our original binary renamed as “backup_testing.exe, remember that “testing.exe” was packed with UPX.
Since we already know how, in theory, a packer like UPX works, we will assume that the entry point will start to run functionality to resolve imported functions and restore the code to a certain memory region, where it will jump after to execute the original executable.
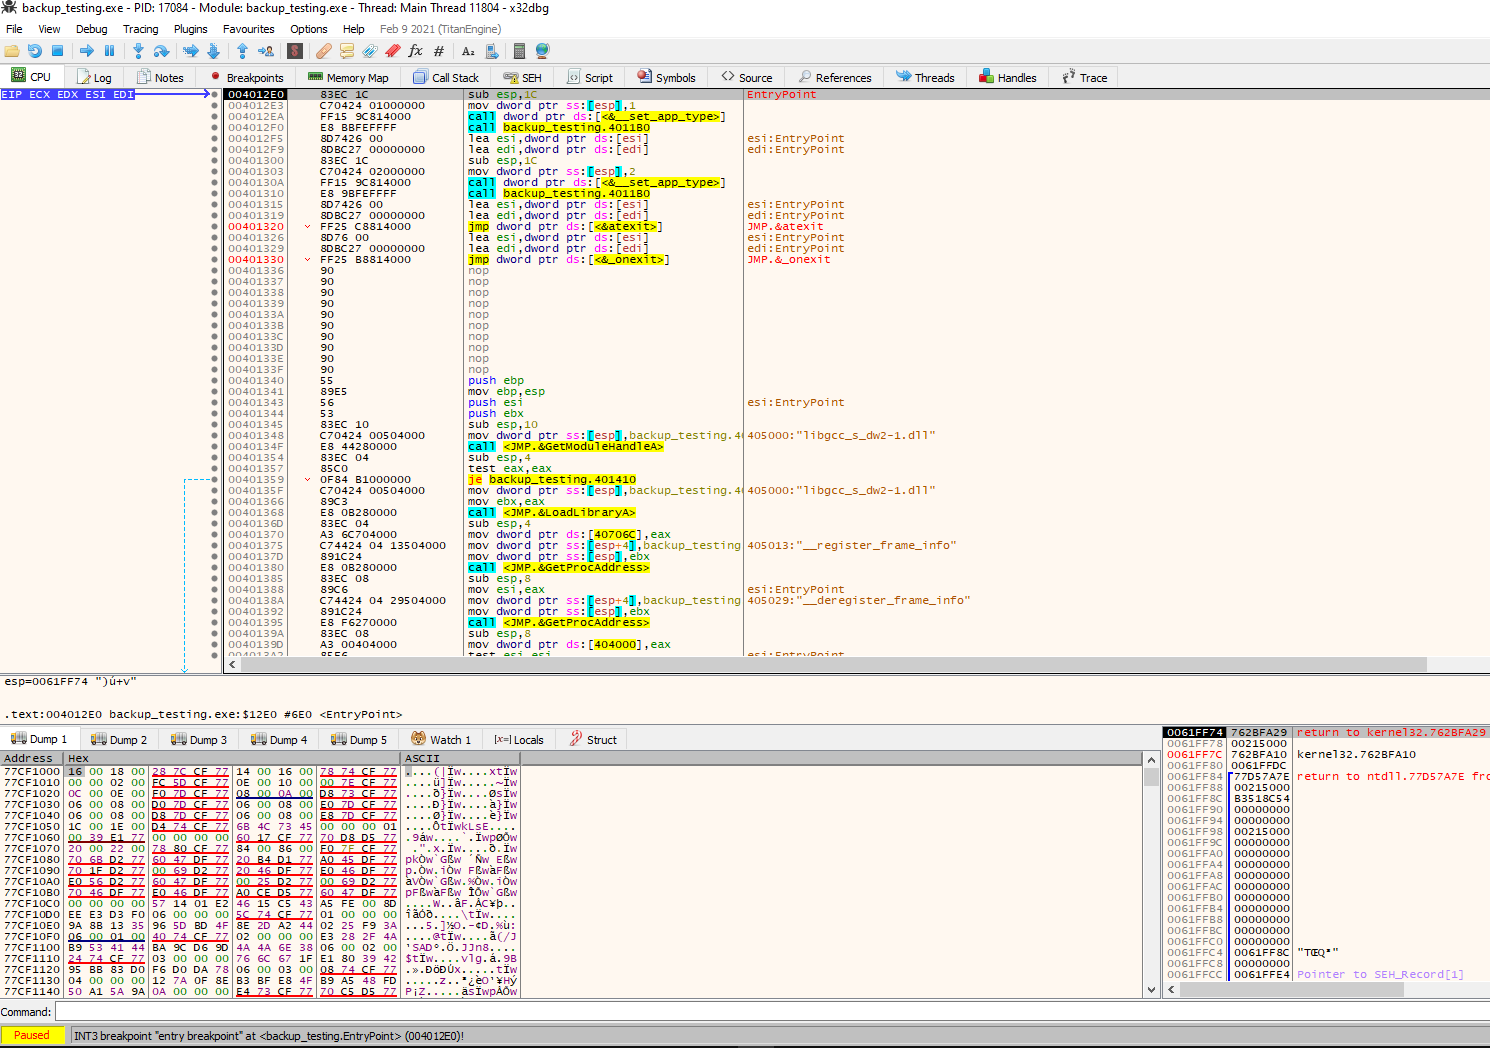
We can take a note or screenshot of the entry point, and if we scroll down, we will see imported modules and then the main function.
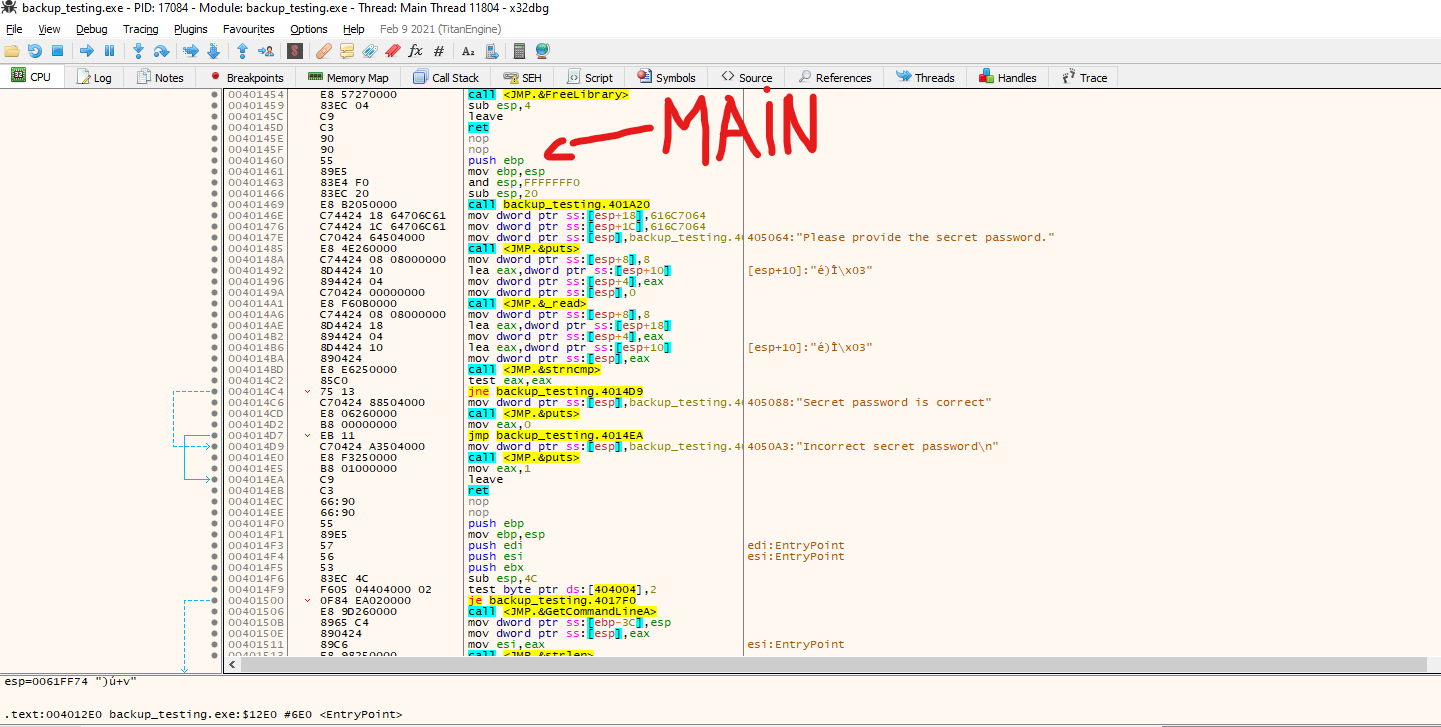
So we expect to follow the execution of the code in the packed binary, and let’s try to figure out if we can extract the original file from the executable.
First, let’s examine the entry point.
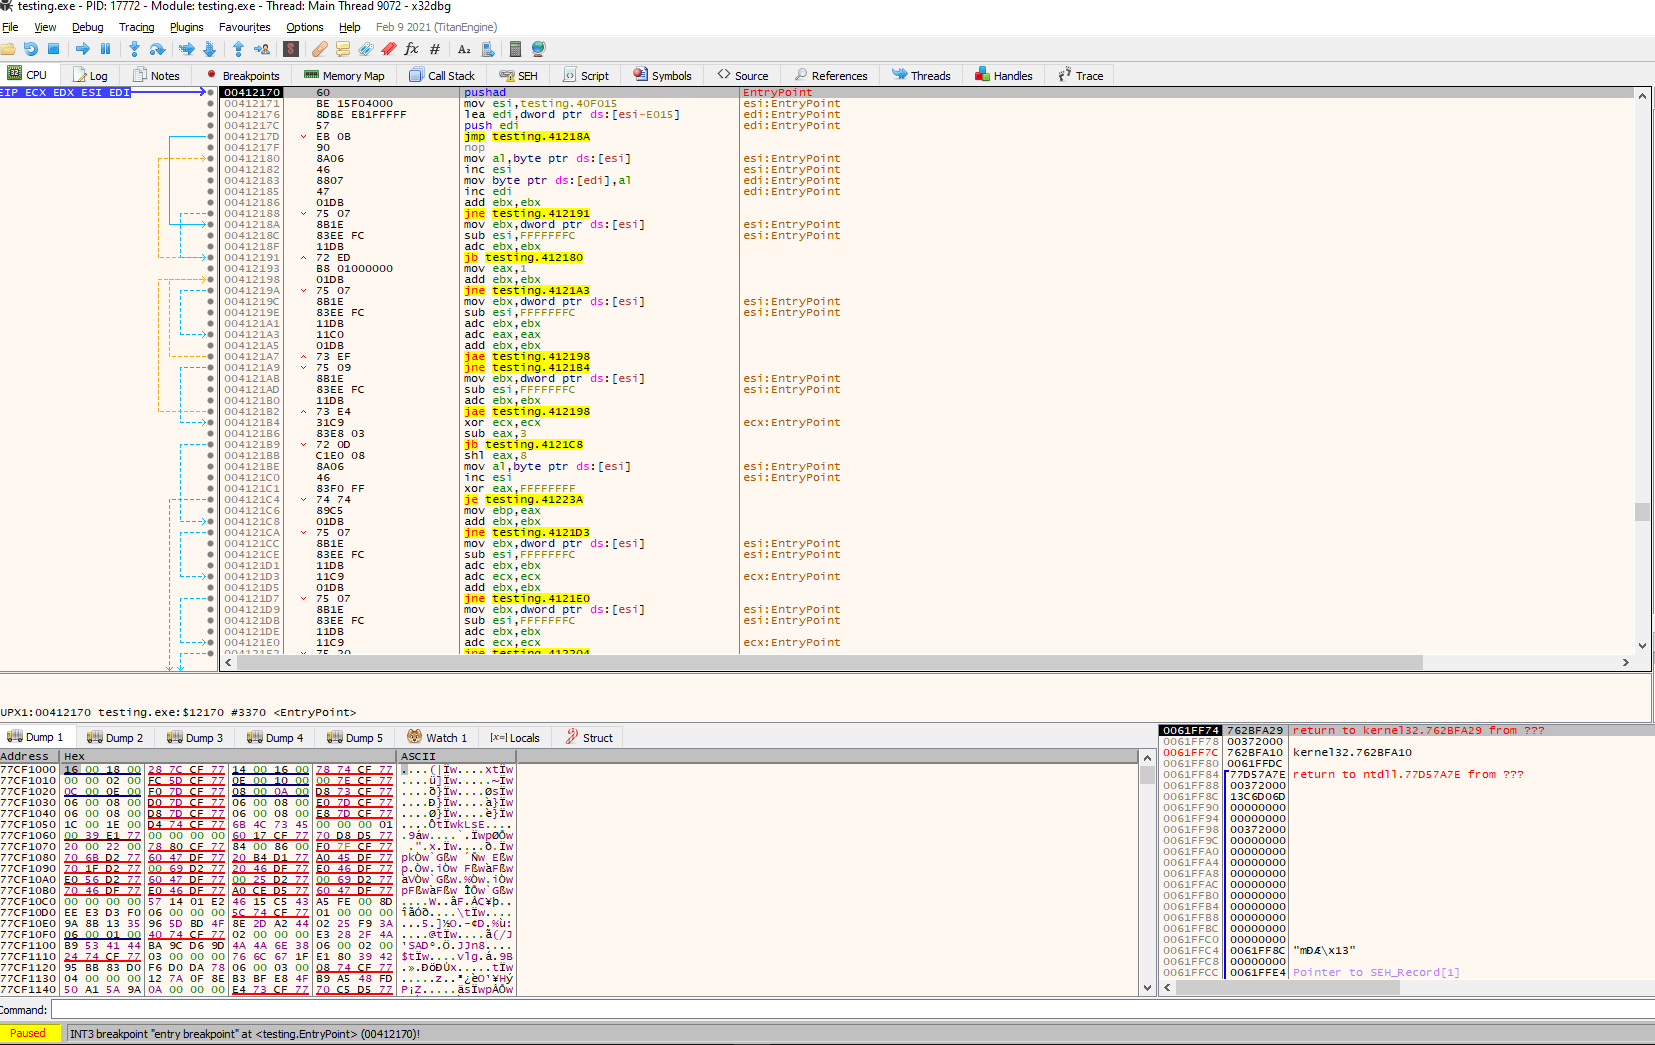
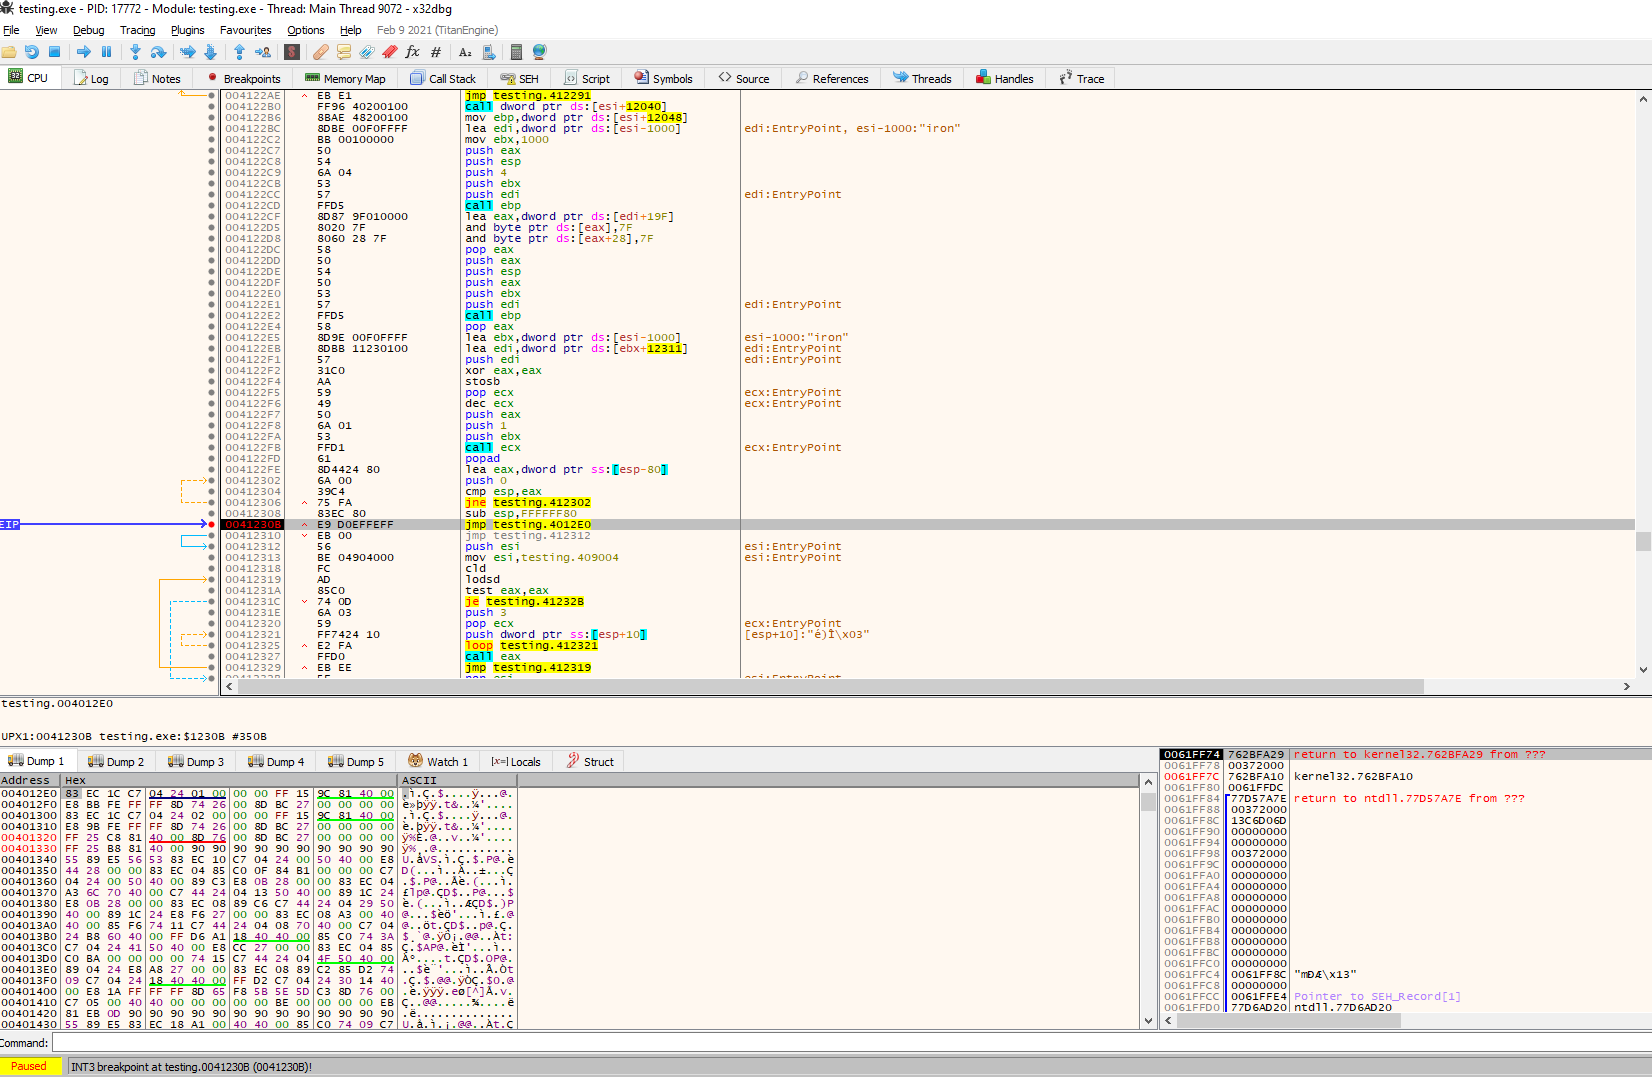
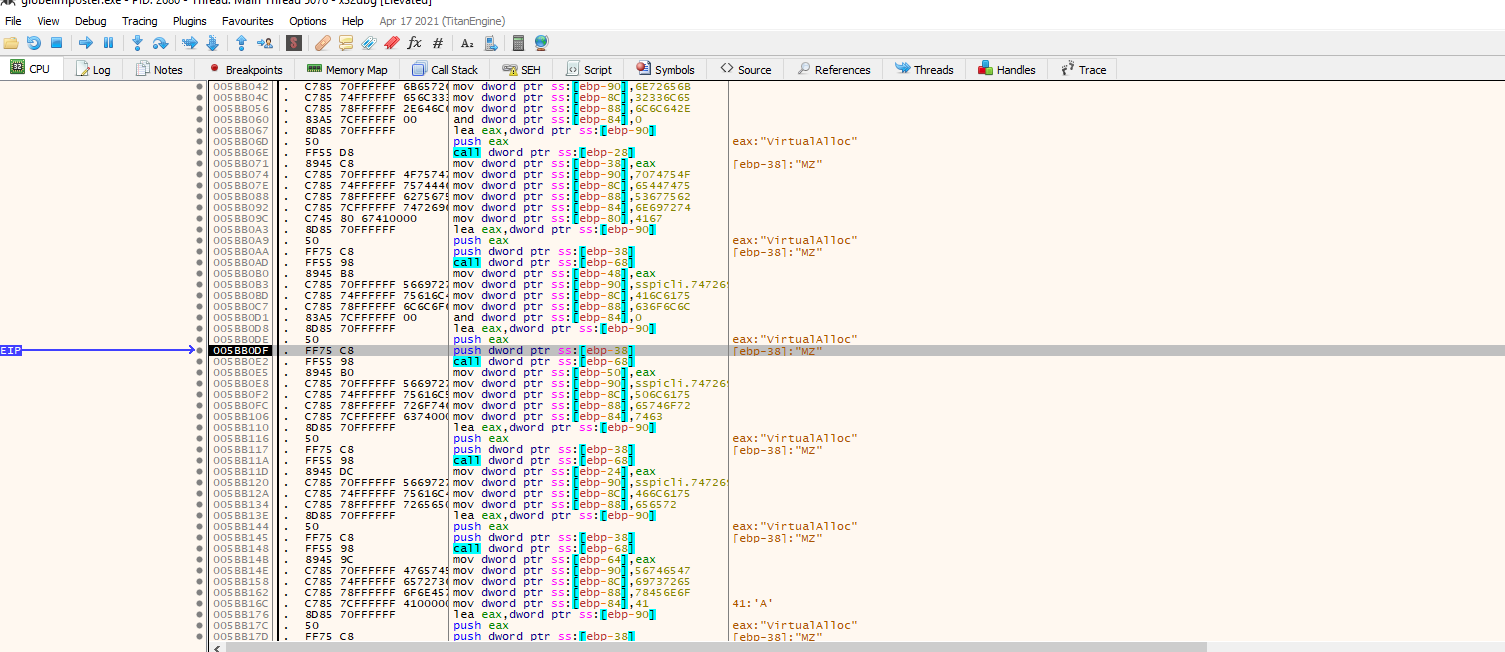
We can see that the entry point, as we expected, looks totally different. From here, we can do several things to try to look for the original code, but something to keep in mind is our first instruction, PUSHAD in address 0x00412170. This instruction pushes the contents of the general-purpose registers onto the stack. This can be used to preserve the state of the registers to, later on, restore it with a POPAD instruction; this instruction pops values from the stack into the general-purpose registers. Taking that into consideration, we can follow up the code looking for a POPAD instruction to see where these registers are restored.
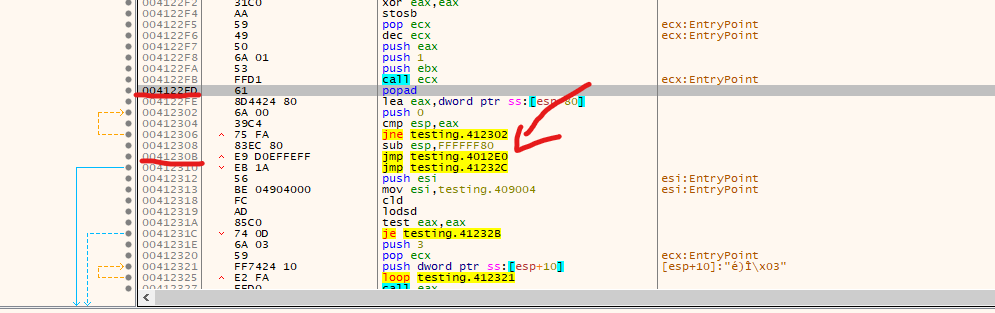
We found a POPAD in the address 0x003122ED, followed by a small jump back, and right after, instructions call our attention. First, we see the stack pointer being modified, so the stack now points in another direction, and then in address 0x0041230B a JMP instruction to a different memory region in address 0x004012E0. Let’s investigate that
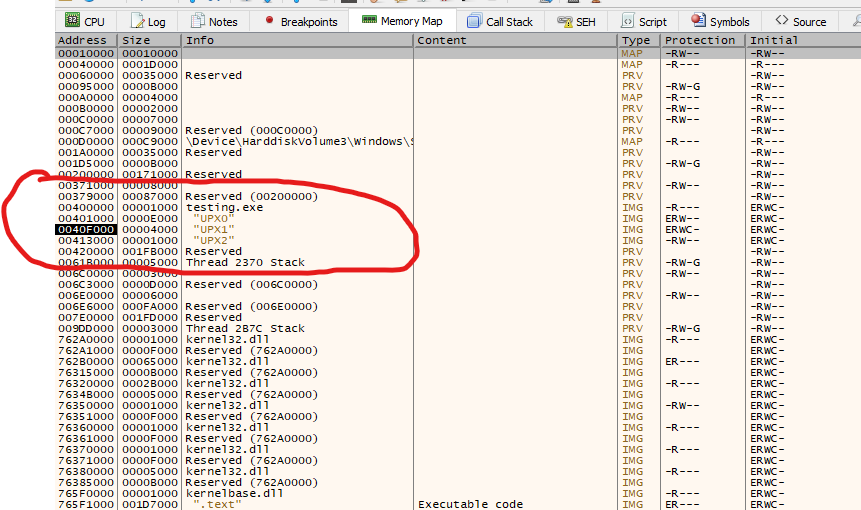
Listed above are the regions that we can access through the “memory map” tab in x32dbg, and we can determine that the address 0x004012E0 corresponds to the section UPX0, while our current EIP where the execution is currently located in address 0x00412170 corresponds to UPX2 section. Let’s follow the memory to where the jump is pointing to 0x004012E0. We can accomplish this by right-clicking on the jmp instruction and selecting: “follow in dump” and then selecting the mentioned address again.

Listed above, we can see that the region only contains NULL bytes. This means that after execution, the stub created by the packer will decompress the data into this region and will allocate the original code. Let’s test this by setting a breakpoint on the jump (you can just select the instruction and press F2, or right-click breakpoints and then select toggle), and start tracing the execution from there. A nice feature of x32dbg is that the memory region selected will automatically change if that’s the case, so we will spot immediately if the
After hitting our breakpoint, we can see that the region is now fully populated with data. Lets see if this match our original entry point:
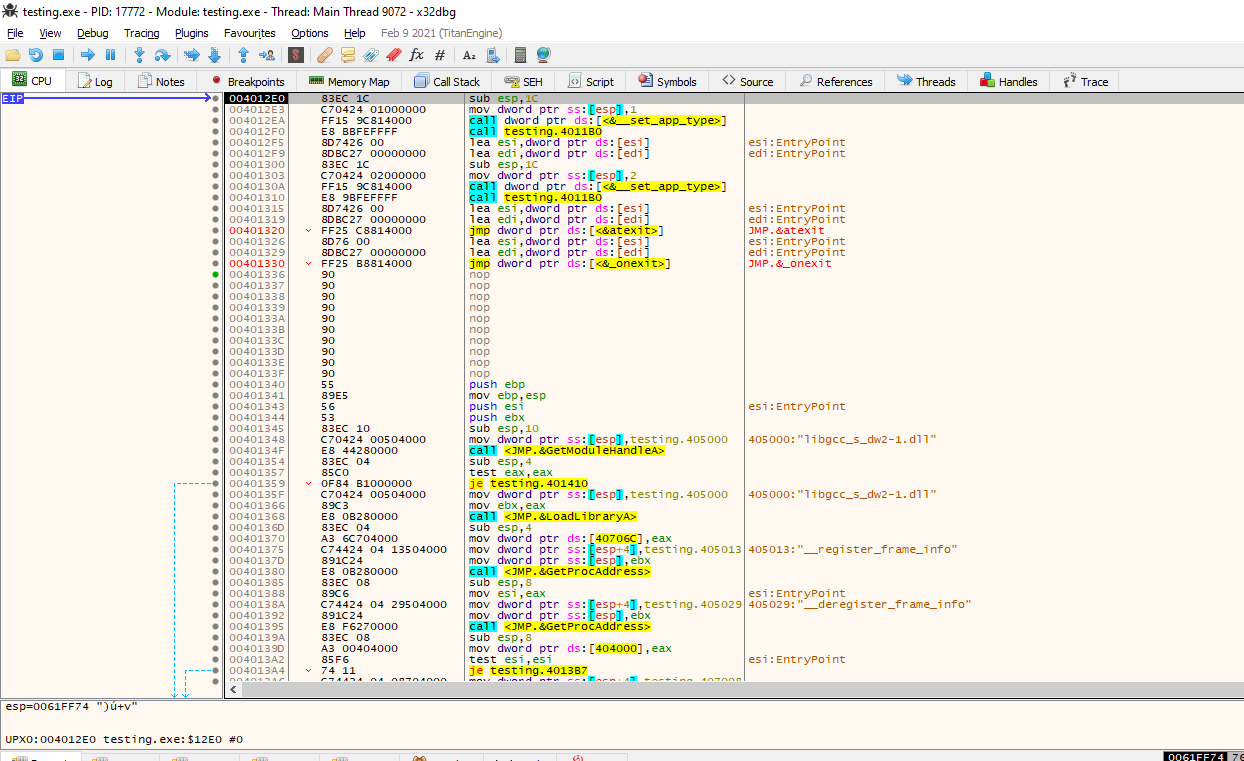
Great, we can see that the jump instruction lands us on what looks exactly like our entry point. Let’s see now if we can extract the binary.
Extracting the binary
To extract the binary, we will relay on a plugin commonly used with x32dbg. Since we can obviously manually extract the bytes, but we will need to manually import the modules, and that could be tedious, let’s use the Scylla plugin. This plugin will build a binary file from the memory location we are pointing to. The plugin is located under plugins while keeping selected the first instruction on the Original Entry Point, OEP. https://github.com/NtQuery/Scylla
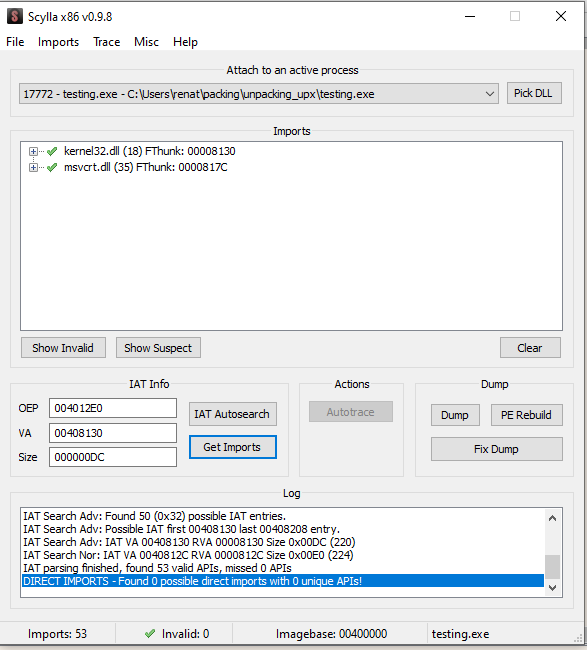
Once the plugin is open, as shown above, click on “IAT autosearch”, and then on “Get Imports” after that, you can just click on “dump” and name the binary. I will call it “extracted.exe”. Let’s test if we were a success by executing the binary
The binary fails in execution. Something must be wrong with the binary, so let’s open the executable in CFF explorer to investigate
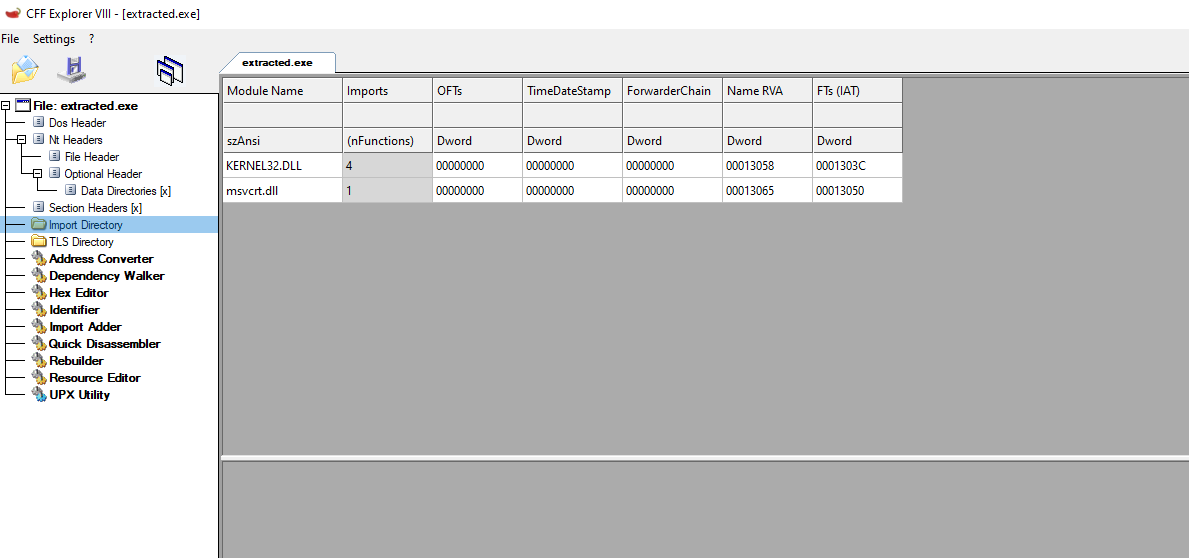
Listed above in the IAT from the extracted payload, we can see that the IAT was not properly reconstructed by the Scylla plugin.
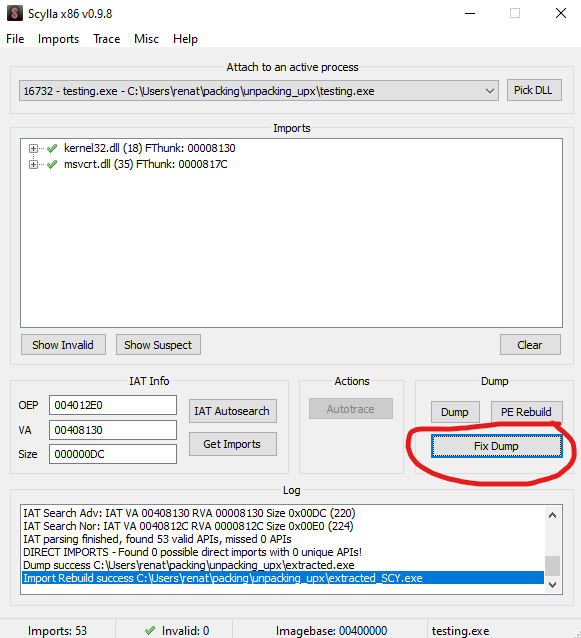
This has a quick fix. After dumping our “extracted.exe” we should select “fix binary” as shown above on the dump section and select our “extracted.exe” file. This should Create a file named “extracted_SYC.exe” in the current directory.

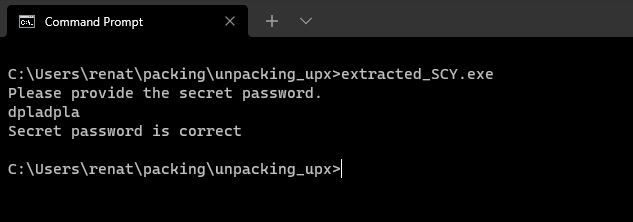
We can see that the issue was fixed, and now the binary executes properly.
Manually unpack a malware sample
Using what we learn let’s try to unpack a malware sample, using the tools we have used so far, in order to do that a disclaimer needs to be made, you need to be EXTRA careful when dealing with malware, I will use a real sample on this link:
https[:]// malshare.com/sample.php?action=detail&hash=612974dcb49adef982d9ad8d9cbdde36
The URL is altered just in case, but the download is not direct, but just to be safe and also this is a good practice when sharing malware samples links. You will also need to create a user to be able to download the file, and also please use it on a VM isolated from your network and your host computer.
I will be using the FLARE VM, which I recommend. Please use this link if you want to install it. https://github.com/mandiant/flare-vm
We will also be working with a sample of GlobelImposter malware from the Ransomware family https://en.wikipedia.org/wiki/Ransomware https://blog.malwarebytes.com/detections/ransom-globeimposter/#:~:text=GlobeImposter%20is%20a%20ransomware%20application,mimics%20the%20Globe%20ransomware%20family%20.
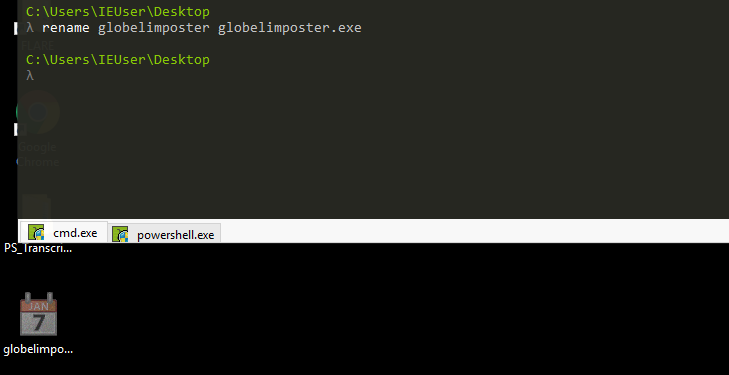
All Right! so we downloaded the sample malware and put it on our desktop, I will rename it globelimposter.exe, and we can see that it has a calendar Icon, a trick for the user to think it’s a safe file.
I took a screenshot of the VM in this state. The idea is to show the malware is really dangerous. You don’t need to recreate this, and as mentioned before, be EXTRA careful when working with malware samples and only execute them in a controlled environment.
If we execute the malware, we will see that it will encrypt our files, let’s take a look (If you want to try this again, be careful)

Listed above, we can see the malware being executed and the files on the desktop being renamed and encrypted.
Now let’s take a static look with CFF Explorer. The sections look good, nothing suspicious, so let’s see if we can get something from deeper analysis.

Listed above are the sections of the globelimposter ransomware.
Static Analysis
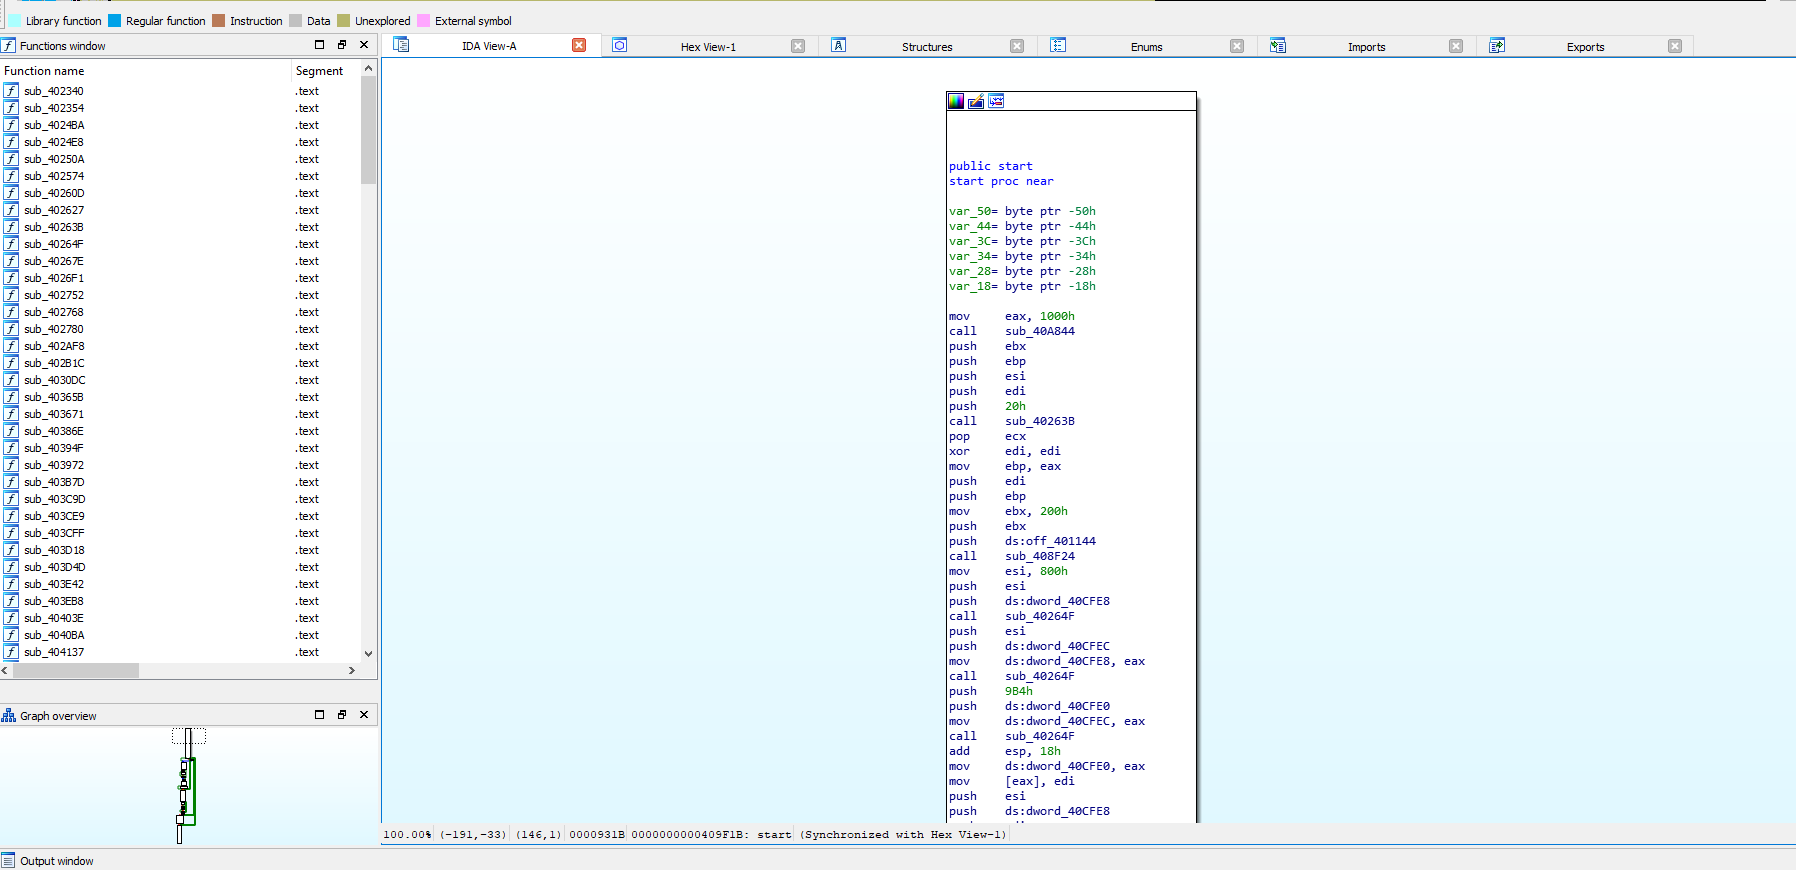
Let’s first open the binary in IDA for some static analysis, and let’s see if we can spot something through the code. It is good to know that every Windows program should have a WinMain or wWinMain Function as an entry point https://docs.microsoft.com/en-us/windows/win32/learnwin32/winmain–the-application-entry-point
int WINAPI wWinMain(HINSTANCE hInstance, HINSTANCE hPrevInstance, PWSTR pCmdLine, int nCmdShow);
so on the entry point we can look for this function, obviously there are no symbols for this program
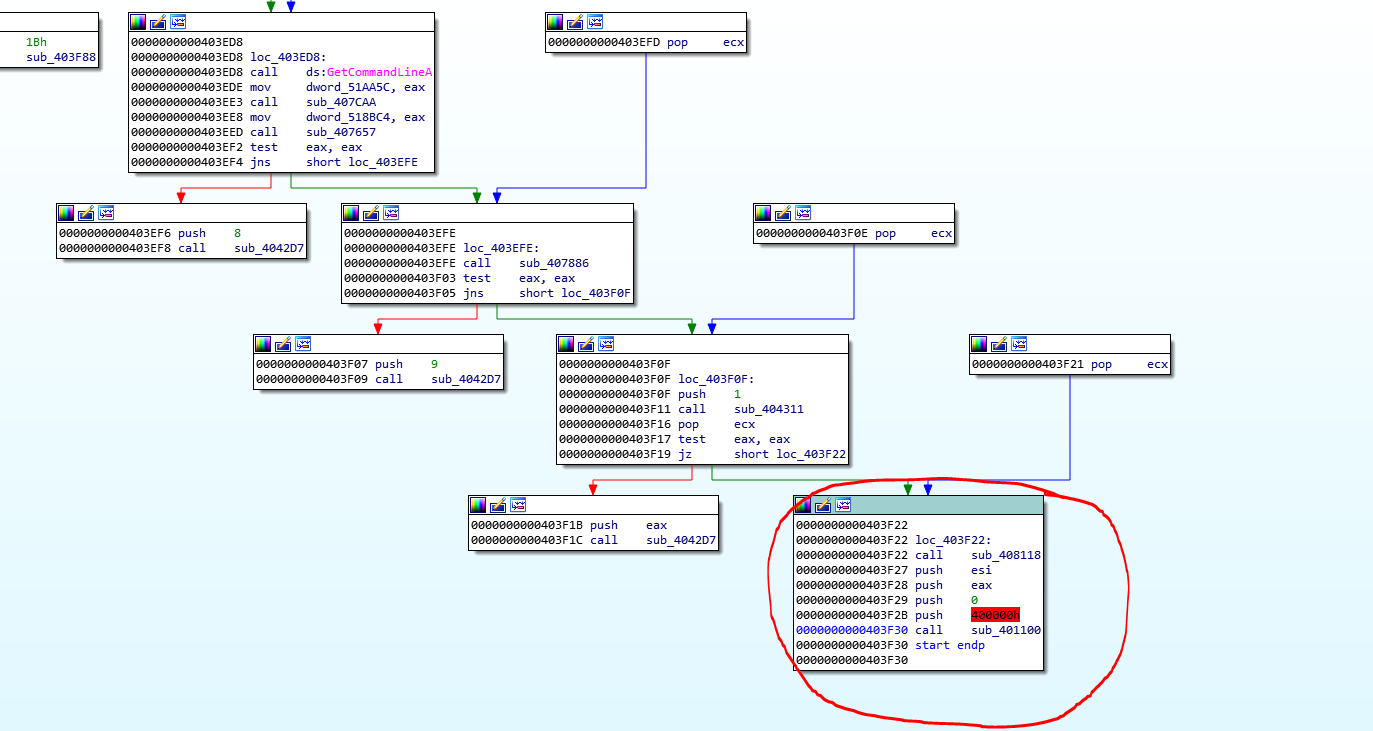
We can still search for the WinMain function; the first parameter, the hInstance definition it’s a handle to a module or to the instance. so we can see on the block of code listed above the value “0x400000” is being passed last to the function sub_401100 and before that, a 0 is passed, and on as the hPrevInstance value and according to Microsoft documentation this value should be zero since is a 16 bit legacy parameter, so 0x400000 looks like the handle and a zero after can provide a clue that this is the WinMain function so let’s rename it _winmain for now, and let’s inspect that function
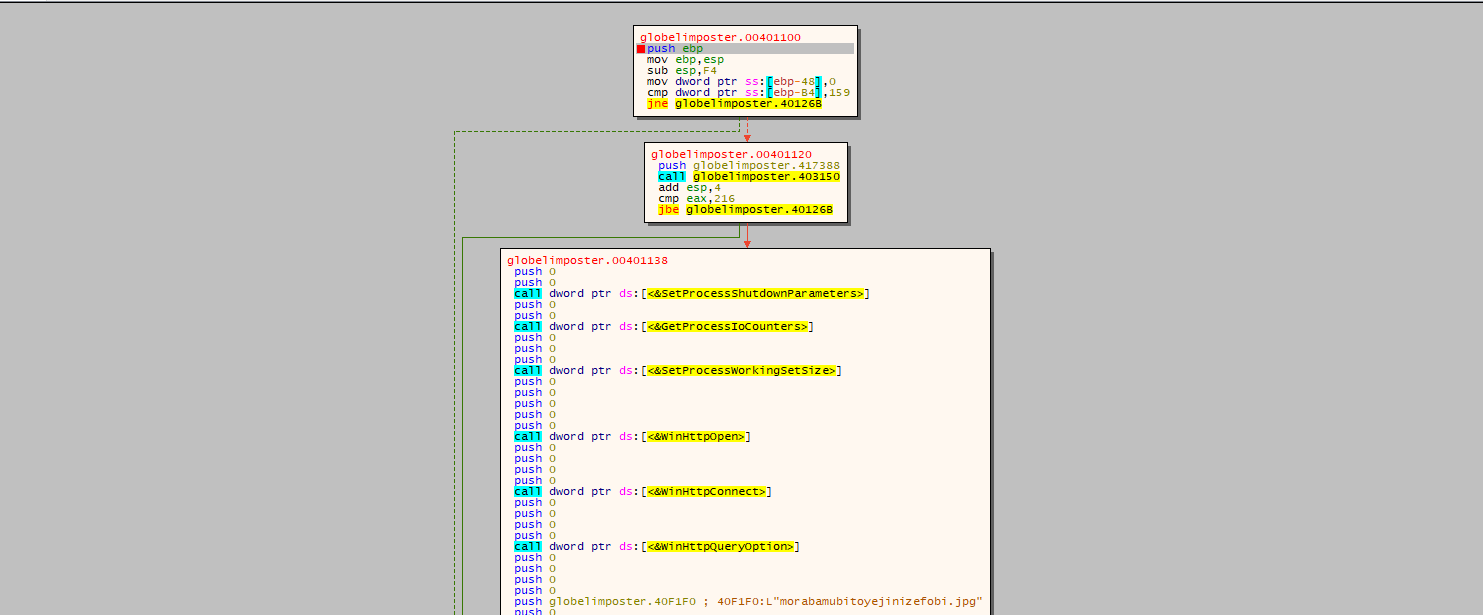
If we follow what we learn so far, there should be a call to either Import de obfuscated or hidden Windows modules and functions that will be imported, usually this is done with LoadLibraryA and GetProcessAddress, as mentioned before. But we already can realize that the code has some obfuscation and part of the code is clearly meant to try to difficult the reverse engineering process and the analysis from potential EDR solutions.
Listed above, you can see that there are a lot if calls different WIN APIs, like WinHttpOpen, but they are only taking “0” as arguments, again this is to distract, someone looking at the file, from what the malware is really doing.
So now that we are in WinMain, we can try to look for the malicious code of the malware. The program would probably move execution with a call instruction to a function or a jmp opcode to the function where the “stub” that will unpack the malicious program is located, or maybe it will return to the same function we are now and then jump again
Also, we already know that in order to “unpack” the malicious code to some location. Some APIs that are used can be VirtualProtect, VirtualAlloc or WriteProcessMemory, This API’s can change the permissions in a certain memory region, write bytes to memory and other things, I will strongly recommend to read about this 3 functions https://docs.microsoft.com/en-us/windows/win32/api/memoryapi/nf-memoryapi-virtualprotect https://docs.microsoft.com/en-us/windows/win32/api/memoryapi/nf-memoryapi-virtualalloc https://docs.microsoft.com/en-us/windows/win32/api/memoryapi/nf-memoryapi-writeprocessmemory
To do this, we should resolve the KERNEL32.dll (or the module where the function we want it to use is located) and then a string with the name be resolved by GetProcAddress. Let’s see if we can spot that functionality on the disassembly.
If we look for the string representation of any of these functions, we would not find it. This is common in malware since the program will try to hide the call to these functions, since they are usually on packing and process injection.
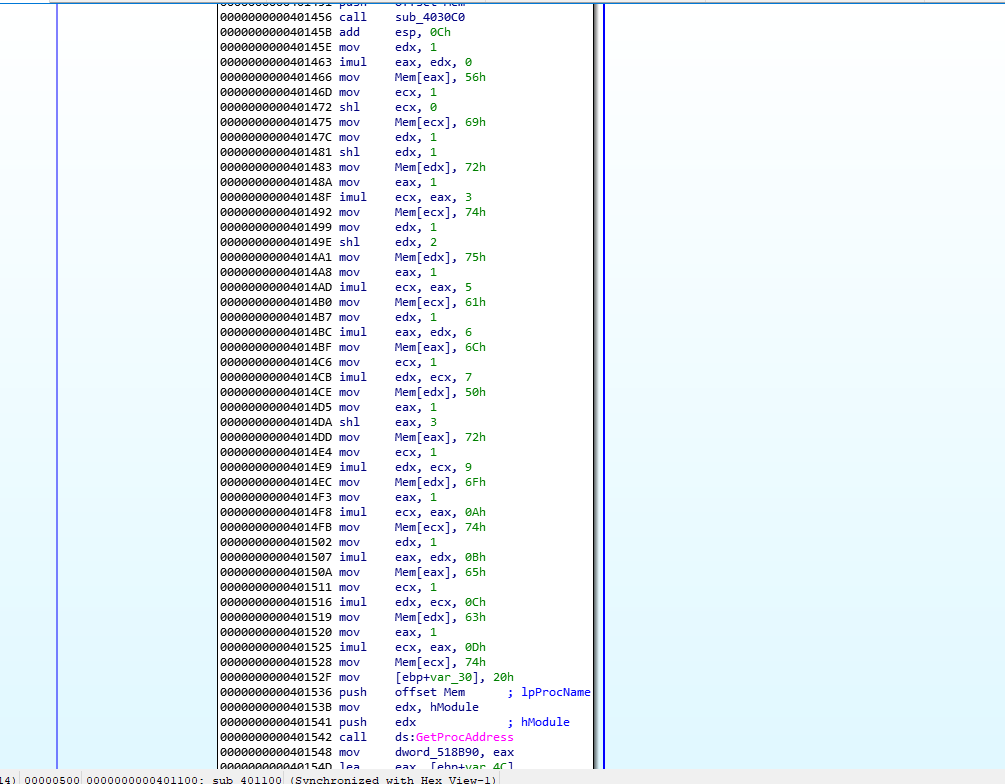
Listed above we do find a call to GetProcAddress, great, but we cannot identify at first glance what values are being passed as arguments. There’s some movement of certain ASCII characters being stored in an offset of memory that IDAnamed “mem” if we take note of them, they look like ASCII characters being stored, then they are pushed as argument to GetProcAddress and remember that the return of this function is the address of the requested one and by standard by Microsoft documentation it will be returned on EAX

If we use python as shown above we can Identify the string constructed as VirtualProtect, so we now know that this malware will try to change some permissions in a memory region, and maybe after that continue execution there.
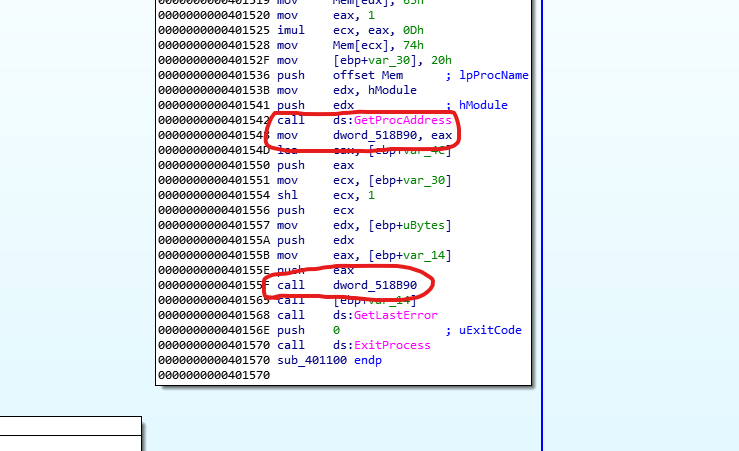
Following the code inside this block we can see that right after the call to GetProcAddress EAX is being moved to a memory location on 0x518b90 that IDA has renamed dword_518B90 (keep in mind that this section may be subject to ASLR) . So we should definitely check what data is being passed and where this function returns.
Also keep in mind that there’s a call to a value on the stack right after, This is named by ida “ebp+var_14”, we can check at the beginning of the code that the value of var_14 is -0x14 so we now this is a stack offset of -0x14 from ebp.
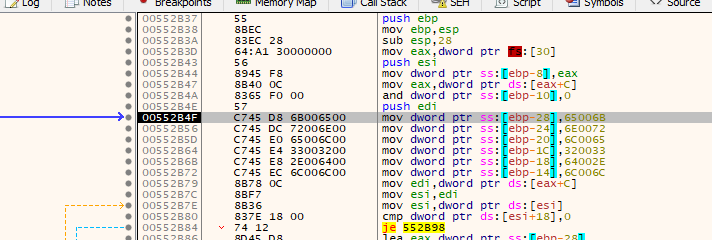
Remember that VirtualProtect will change the permissions in an specific memory area, so this should be an address on the same region that VirtualProtect is changing permissions, we can take a look at where a value is passed to the named “ebp+var_14” location to see where is pointing
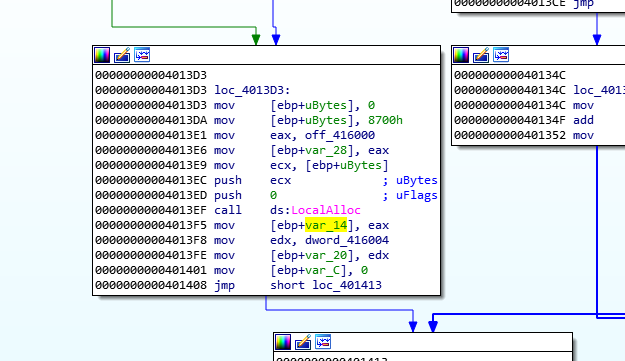
Above we can check that the value 0x8700 is passed to the stack, that IDA renamed as “ebp+ubytes” this value is then moved to ECX and then pushed to the stack followed by a 0 being pushed also and later a call to LocalAlloc. https://docs.microsoft.com/en-us/windows/win32/api/winbase/nf-winbase-localalloc
DECLSPEC_ALLOCATOR HLOCAL LocalAlloc(
  [in] UINT   uFlags,
  [in] SIZE_T uBytes
);
Above we can see the details of the function This function will allocate memory on the heap, using the uBytes as size in our case we know is 0x8700 bytes and the a flag value of zero as uFlags, if we look at the documentation of the API, we know that a value of zero will make the function return a pointer to the allocated data, we know by convention the return value of a function is on EAX so we now know that this will be the region that VirtualProtect will change permissions. https://docs.microsoft.com/en-us/windows/win32/memory/heap-functions
Let’s see if our analysis is correct by analyzing the program in the debugger.
Dynamic Analysis and malware extraction
Based on our static analysis we should corroborate that:
- Identify the call to WinMain, and observe if we are correct in our analysis
- Identify the call to VirtualProtect
- Follow the execution from VirtualProtect to see if we can spot the malicious code.
Ok then so lets execute the file on the debugger but, again we should pause on Entry Point since, we don’t want the ransomware to fully execute or the machine will be infected and we will need to revert it with a snapshot.
Once we open the file on x32dbg we can check the breakpoints tab to check the breakpoint that x32dbg sets by default on the entry point of the program. so we are safe to click run since we will hit that breakpoint, again be EXTRA careful and always check first
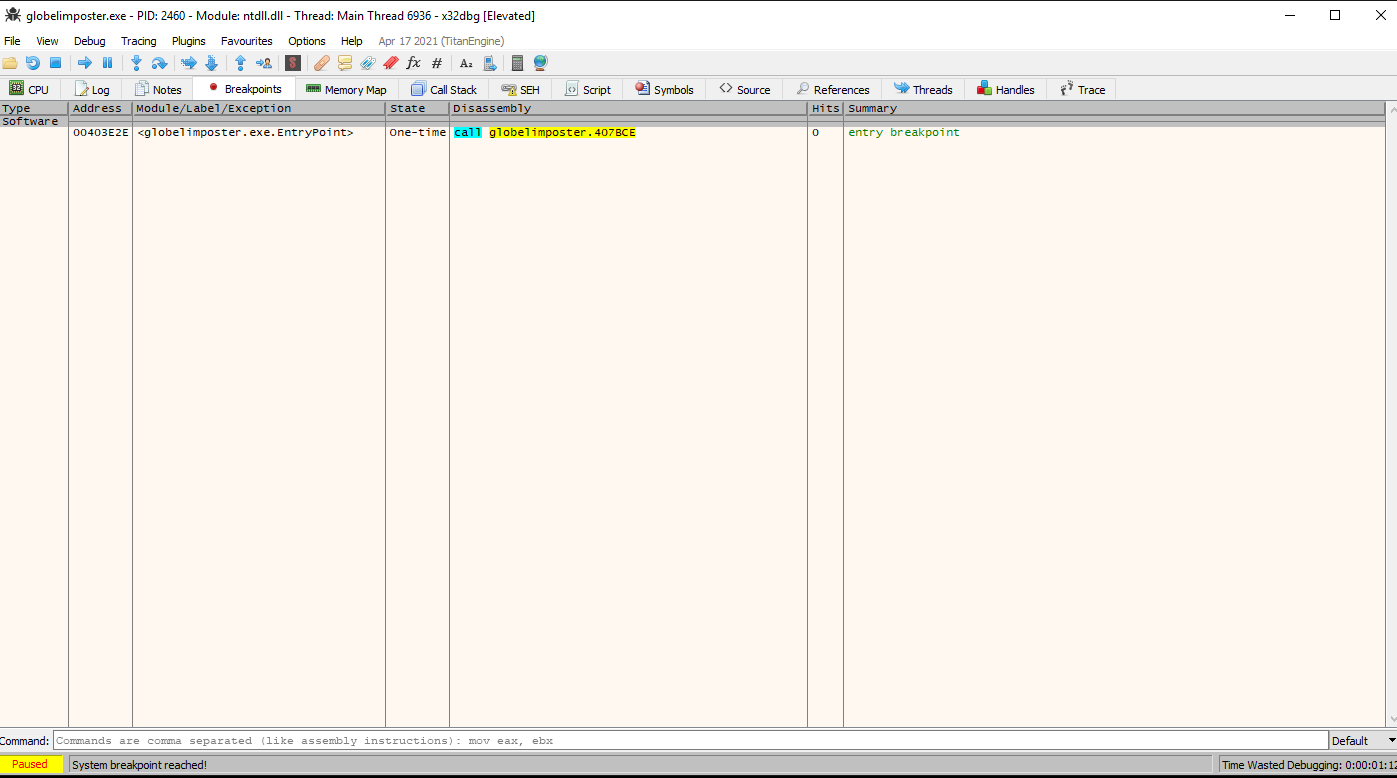
So lets click run and we can observe that we are on the entry point same as IDA
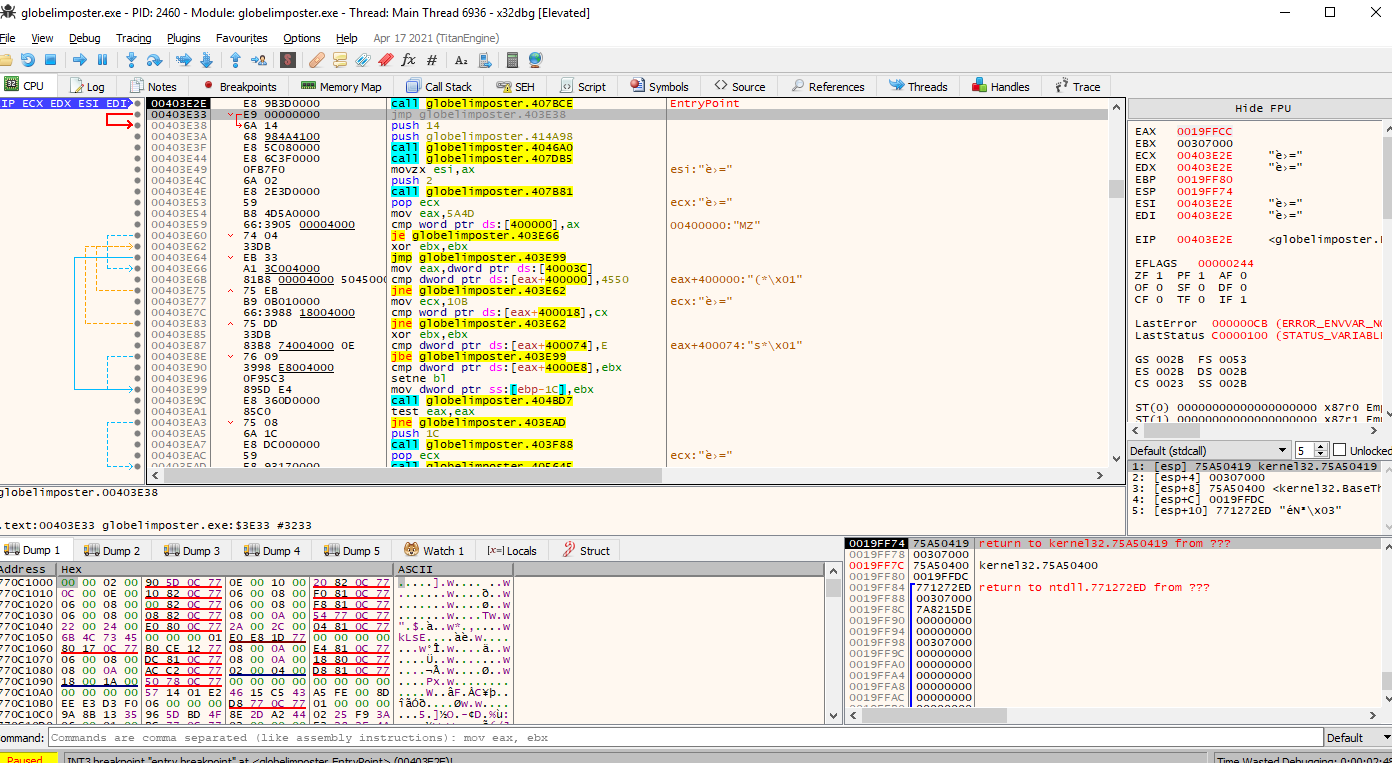
a cool function from x32dbg is to display the memory as graph, in the same way as IDA, if we click “g” on the screen it will display the memory as graph, let’s give it a try and lets see if we can spot the call to WinMain
Great, now let’s follow that address on the call (after the push 400000 value) and let’s set a breakpoint using the “F2” key on the first instruction, it should turn red, as the image below
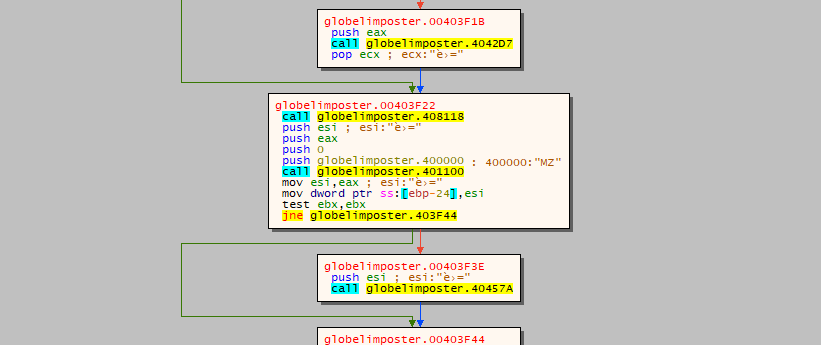
Now we can press run and the execution will stop at our breakpoint. We will see a buffer being set with 0xF4 bytes size so this indicates that we land in the proper function, and we can also go to graph mode and look for the call to VirtualProtect instruction Lets set a breakpoint there
Now that we are in the breakpoint let’s take a look at the arguments being passed to the function
After we hit the breakpoint we see that x32dbg has renamed the offset of memory to VirtualProtect and at bottom right we can see the contents of the stack, so we can inspect the argument to the function
BOOL VirtualProtect(
  [in]  LPVOID lpAddress,
  [in]  SIZE_T dwSize,
  [in]  DWORD  flNewProtect,
  [out] PDWORD lpflOldProtect
);
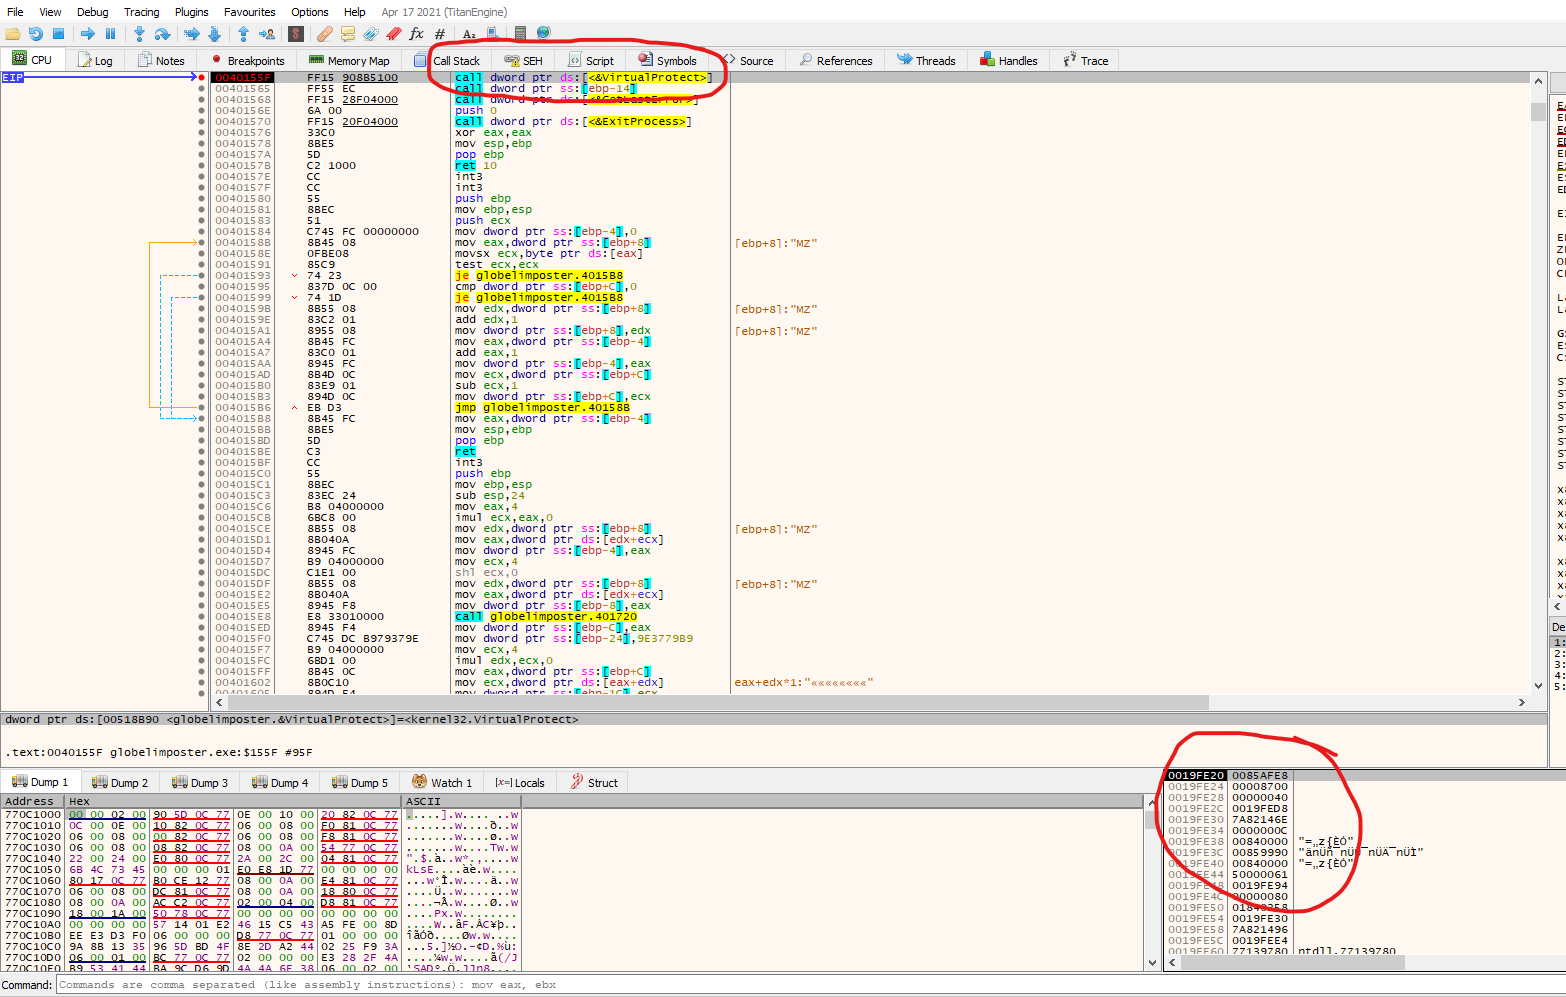
We know the arguments of VirtualProtect form microsoft documentation, so from above and from the values on the stack in this example we can infer:
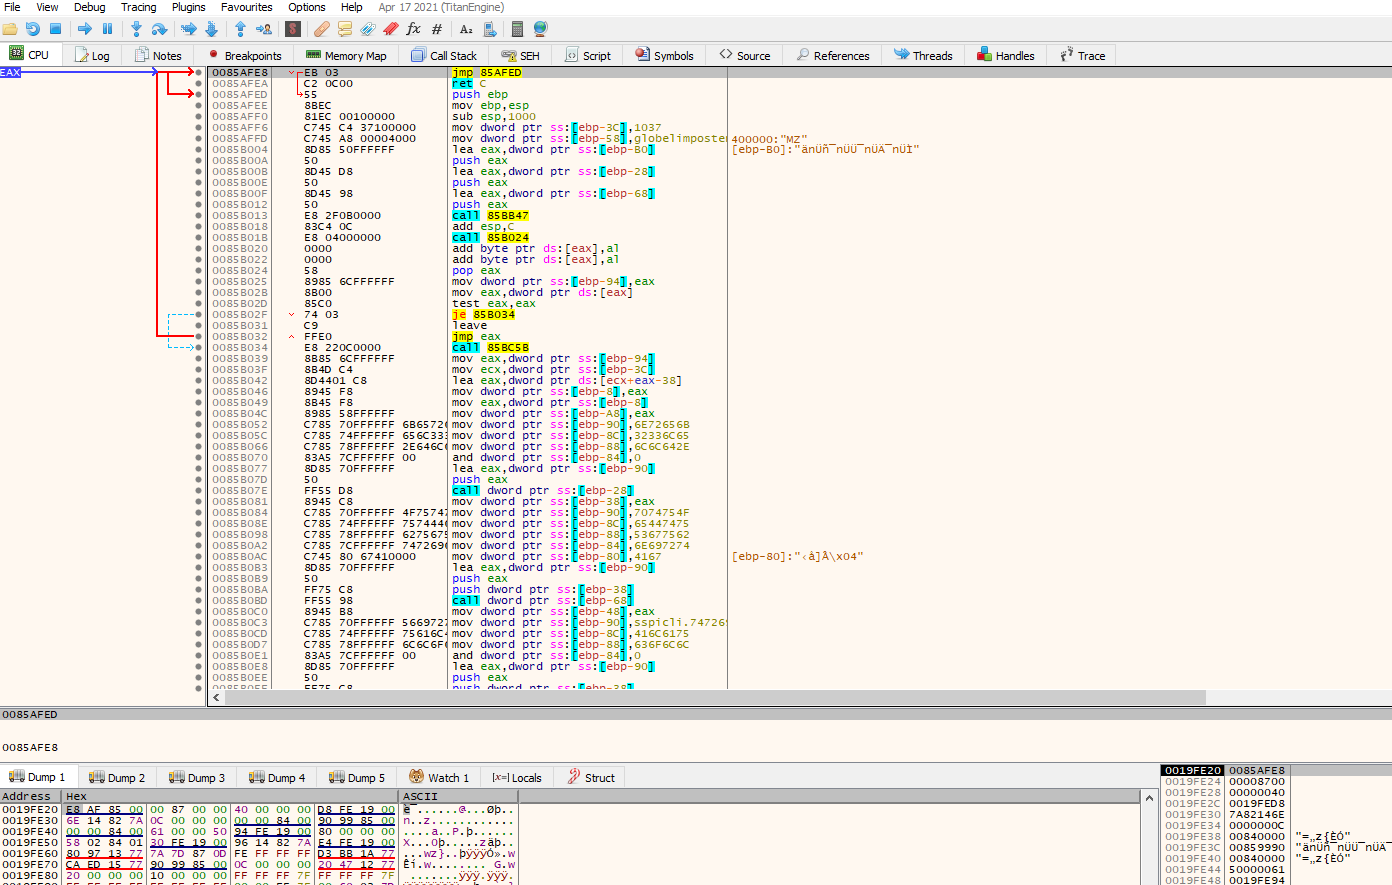
- 0x0085AFE8 will be the address from which VirtualProtect will change permissions
- 0x8700 will be the size of the memory space that will be affected
- 0x40 flag indicate that the permission will be set to PAGE_EXECUTE_READWRITE according to the memory protection constant https://docs.microsoft.com/en-us/windows/win32/memory/memory-protection-constants
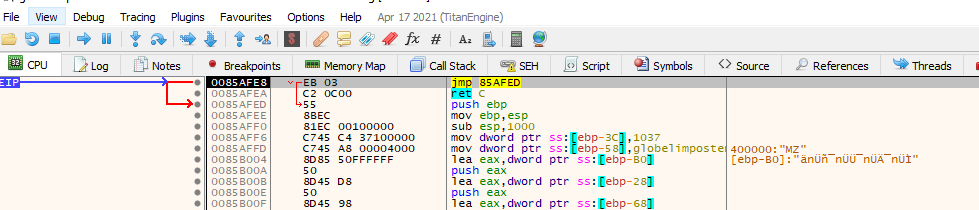
The last argument is an address where the previous permissions flag will be written. If we right click over the first argument in ou case 0x0085AFE8 and press follow in-memory map, we can check the permission are not set to execute
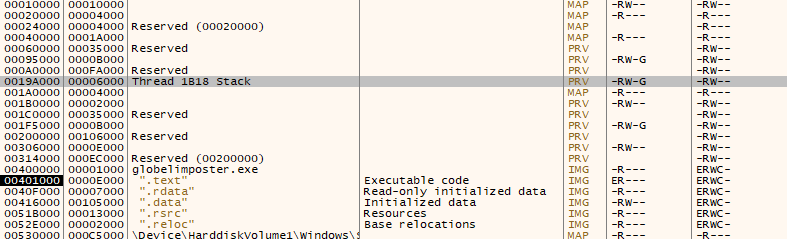
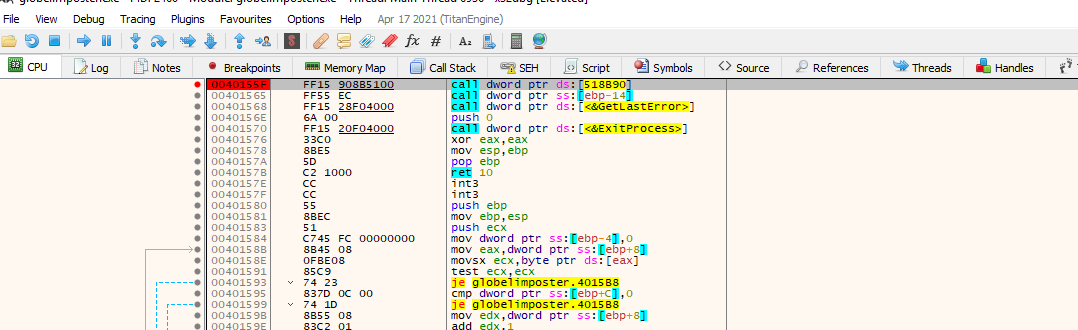
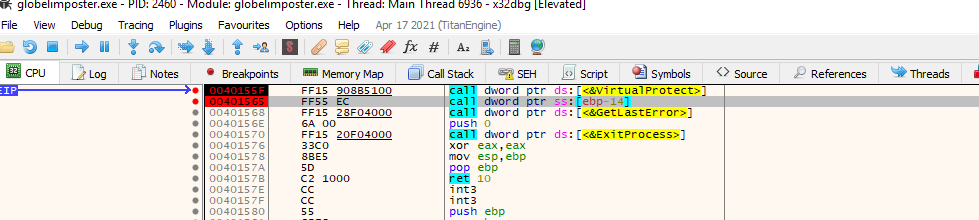
If we do the same, right click but this time we press follow in disassembler, we will see that there’s actual code on that region, so this confirms our static analysis that the program will change the permissions on this region in order to execute code on it.
Let’s return to where our EIP is (you can double click on the EIP on the register section on x32dbg) and let’s set a breakpoint on the next instruction after the call to VirtualProtect where we are pointing now, this should be the call to EBP-0x14
Let’s click run.
After hitting the breakpoint again, we can step into the function to see if we are direct into the code, we can do this with “F7” key or clicking on the “step into” icon
Great, we can see that the execution was properly redirected and that we are now going to execute code in this region, we can play along with the code (remember to be careful since we are working with malware so if something fails, you should revert the VM). Also we can press on the “push ebp” instruction, right click and add as a function to better display information.

Let’s set a breakpoint on the first function being called and then “step into” with the “F7” key. If we follow the code will hit a point where some values are pushed on the stack as the image below :
This is a common obfuscation technique instead of writing the string the developer needs its build during execution. we can see the string being built by clicking “follow address in dump” to one of this values being pushed for example the one being pushed from ebp-0x28

Above we can see the string Kernel32.dll in UNICODE being constructed, so we assume that this will probably load some modules, let’s execute this function until it returns by clicking on the up arrow in the menu
Before we return we can see also that the string LoadLibraryA has been resolved so it will probably resolve APIs that the malware needs to start executing
After return, we can step through the code and see who various API are being resolved as the example for VirtualAlloc above. Now since we are resolving the API, Let’s see if we can find an interesting JMP to register or JMP to memory instruction that can lead us to where maybe The Original Entry Point for the malicious code is.
If we look at the image above we do find a JMP EAX, and it seems that the malware developer made some mistake and they leave a string that will be print to the debugger telling us that we will “JUMP to OEP), let’s set a breakpoint in this JMP instruction and let’s follow execution
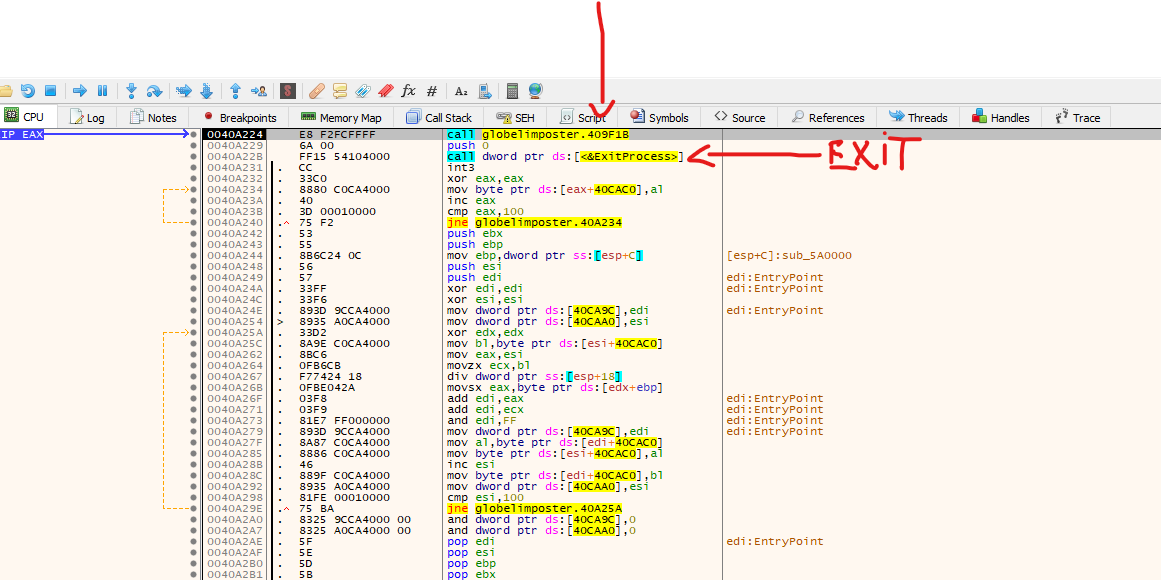
Above we can see that the jump took us to this code. We can assume it’s our Original Entry Point (OEP), but right after the first call, we see an exit call, so let’s step into the first function, that should be our OEP.
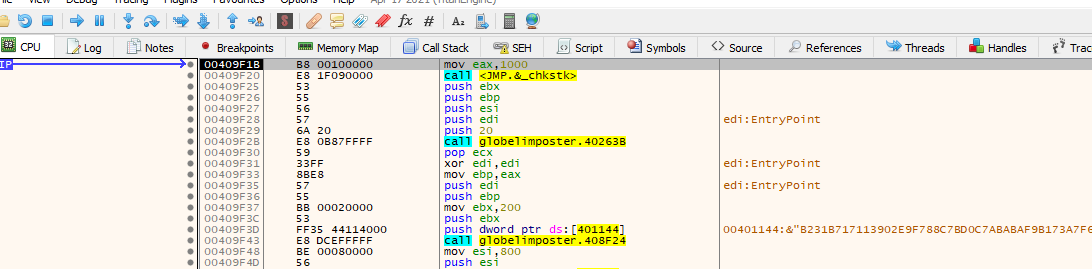
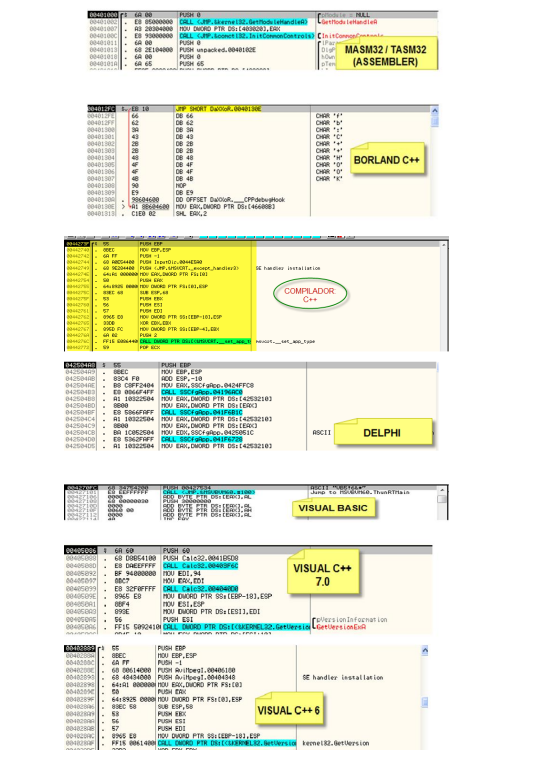
Above we can see the Original Entry Point, how do we know this? We can take a look at what compilers do for different languages and that way identify if it corresponds to an Entry Point. The best resource I found is this image from a CLS tutorial (thanks to @solid_cls) where you can see that the call to a jmp (like in our example) is common for Visual Studio. That’s why we can observe that this is the Entry Point for the program. https://drive.google.com/drive/folders/1g90QJNfJ4mlV8_JT-S4t__1VifO2A4l_
https://t.me/crackslatinos
With this information, let’s try to extract it with Scylla again,
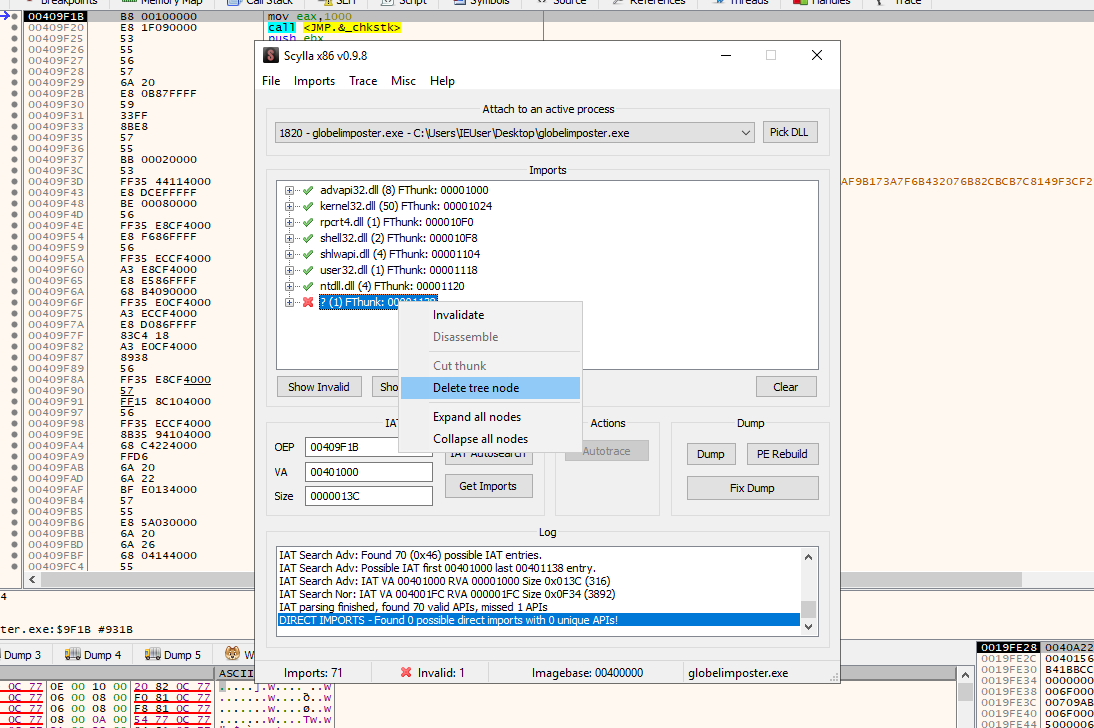
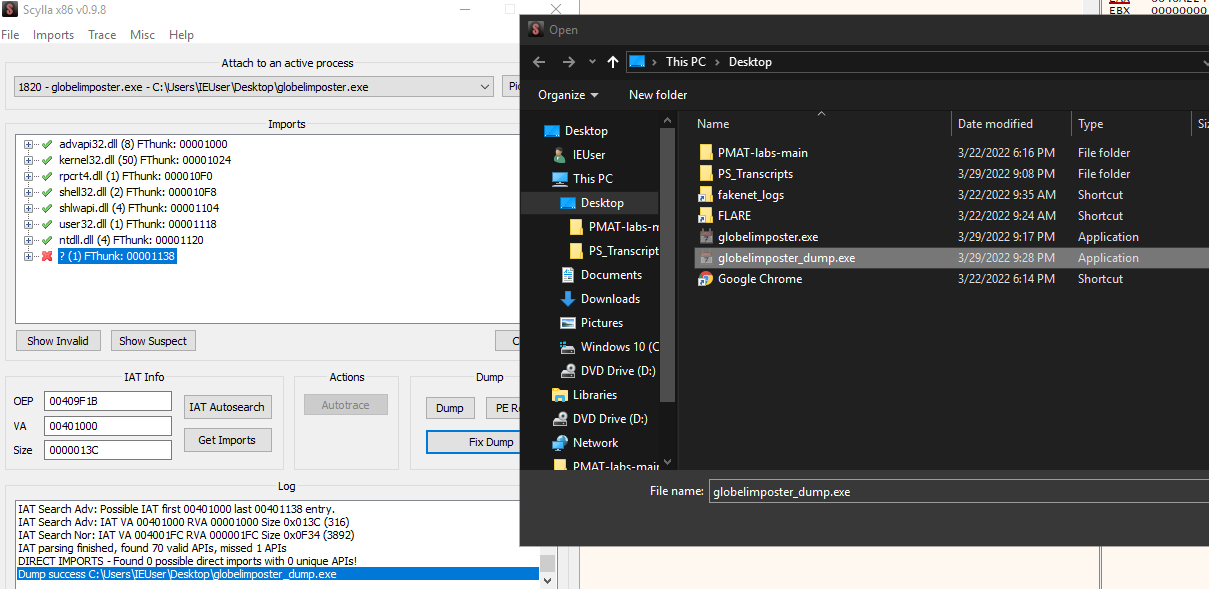
As you can see above, After getting the IAT with IAT Autosearch and Getting the imports with Scylla, We got an error trying to import a module, we should remove this module if we want to dump the binary if not, and execute it, otherwise it will nor run, and only static analysis could be performed, We can do this by right-clicking on the module and pressing “Delete Tree Node”. And then dump , let’s dump the file as “globelimposter_dump.exe”
Also as shown above, don’t forget to “Fix Dump” the globelimposter_dump.exe, with this SYLLA will create a file named : globelimposter_dump_SYC.exe, And we can open it on IDa and see that we analyze and perform static analysis on it as shown below
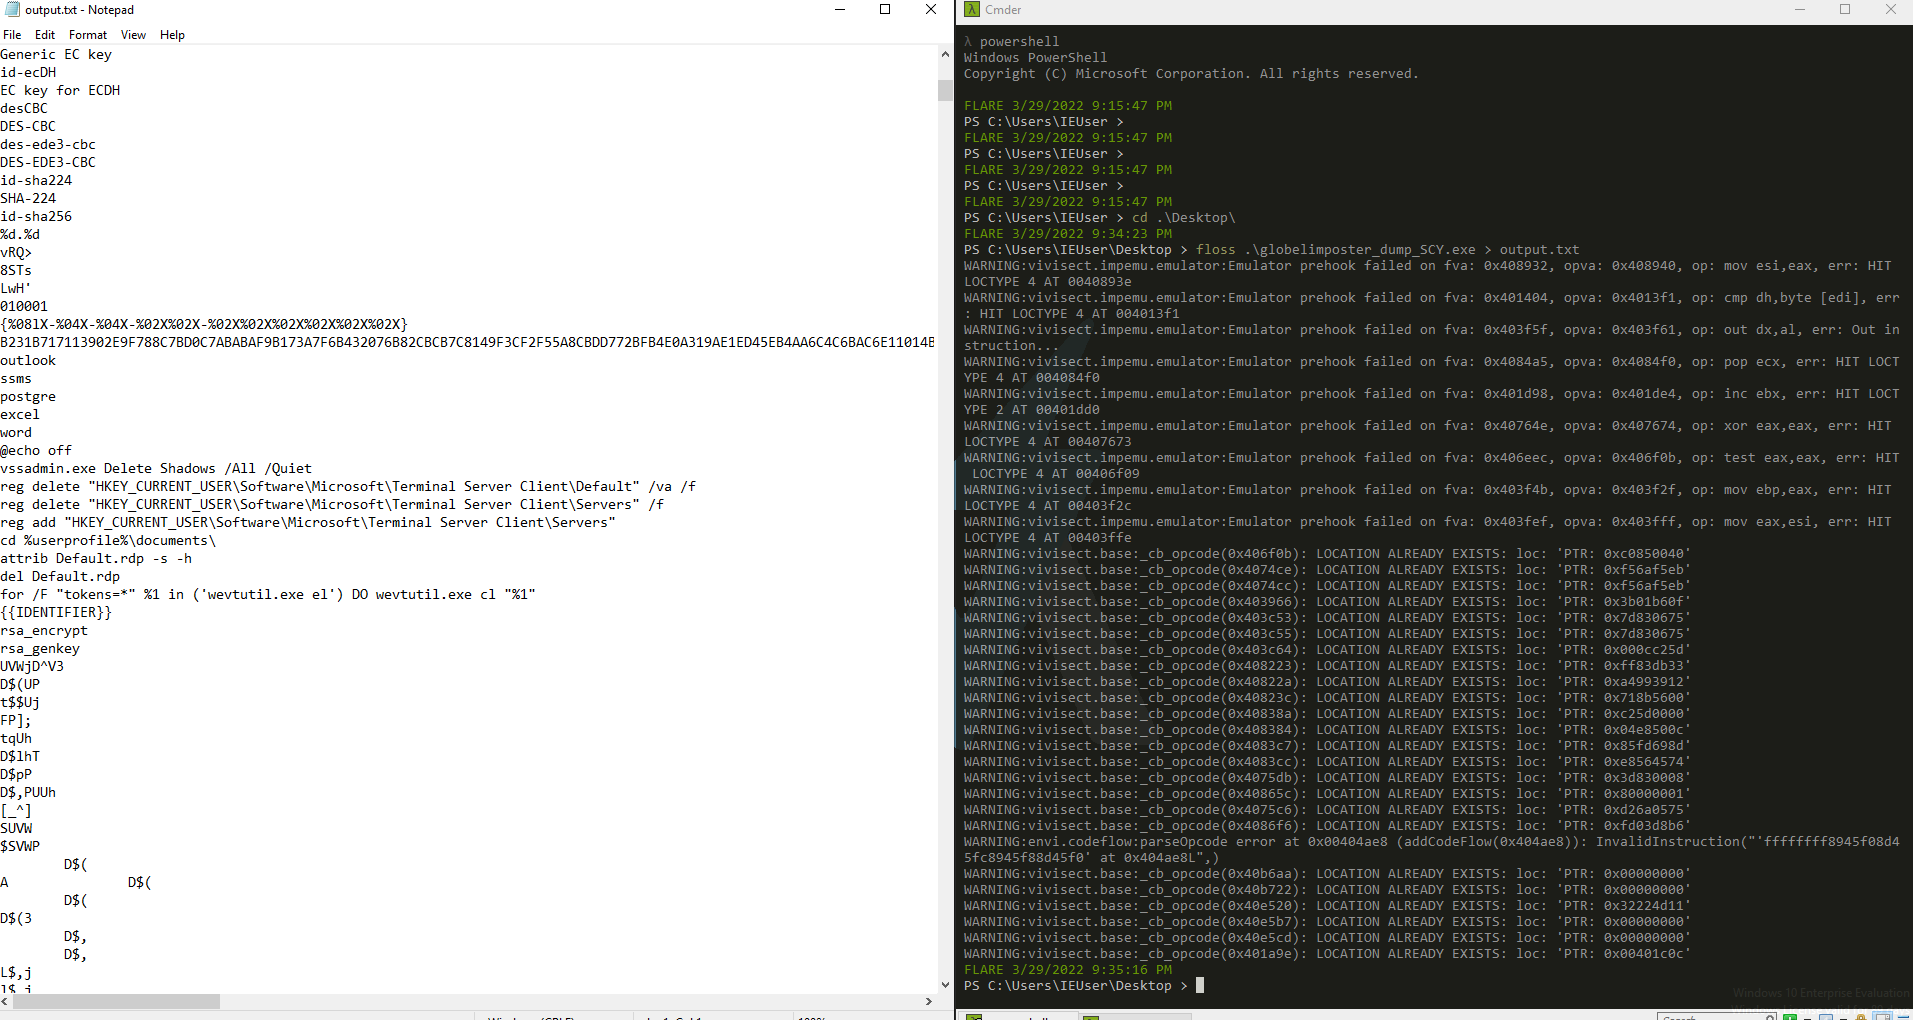
Also we can run floss and direct the output to a text file, to see the strings from the dumped binary to start analyzing as show below
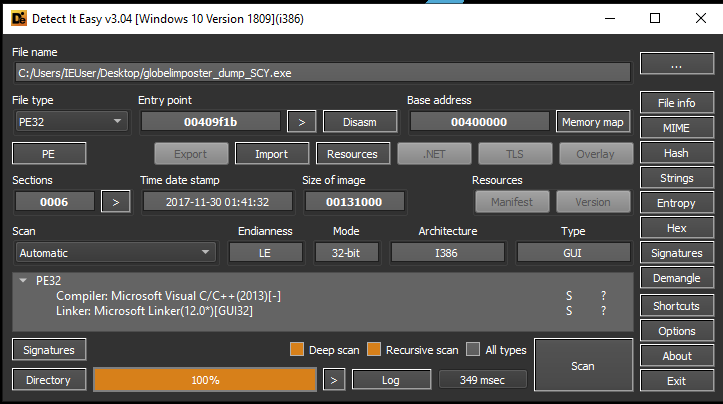
Some registers and commands are populated, there could still be more obfuscation, but for now, we can work on this binary to analyze more data and get new IOC, we successfully extract the packed executable. Also we can check if it’s unpacked with a software like DetectitEasy, that will reveal that the compiler used was indeed Visual C/C++ as the next image displays https://github.com/horsicq/Detect-It-Easy
Now to finalize, let’s run the unpacked version of the malware, to see if it will encrypt our files again. We can take a screenshot before the malware is executed, as shown below

And another one after execution we can see the files on the desktop being renamed and encrypted again, on the image below:
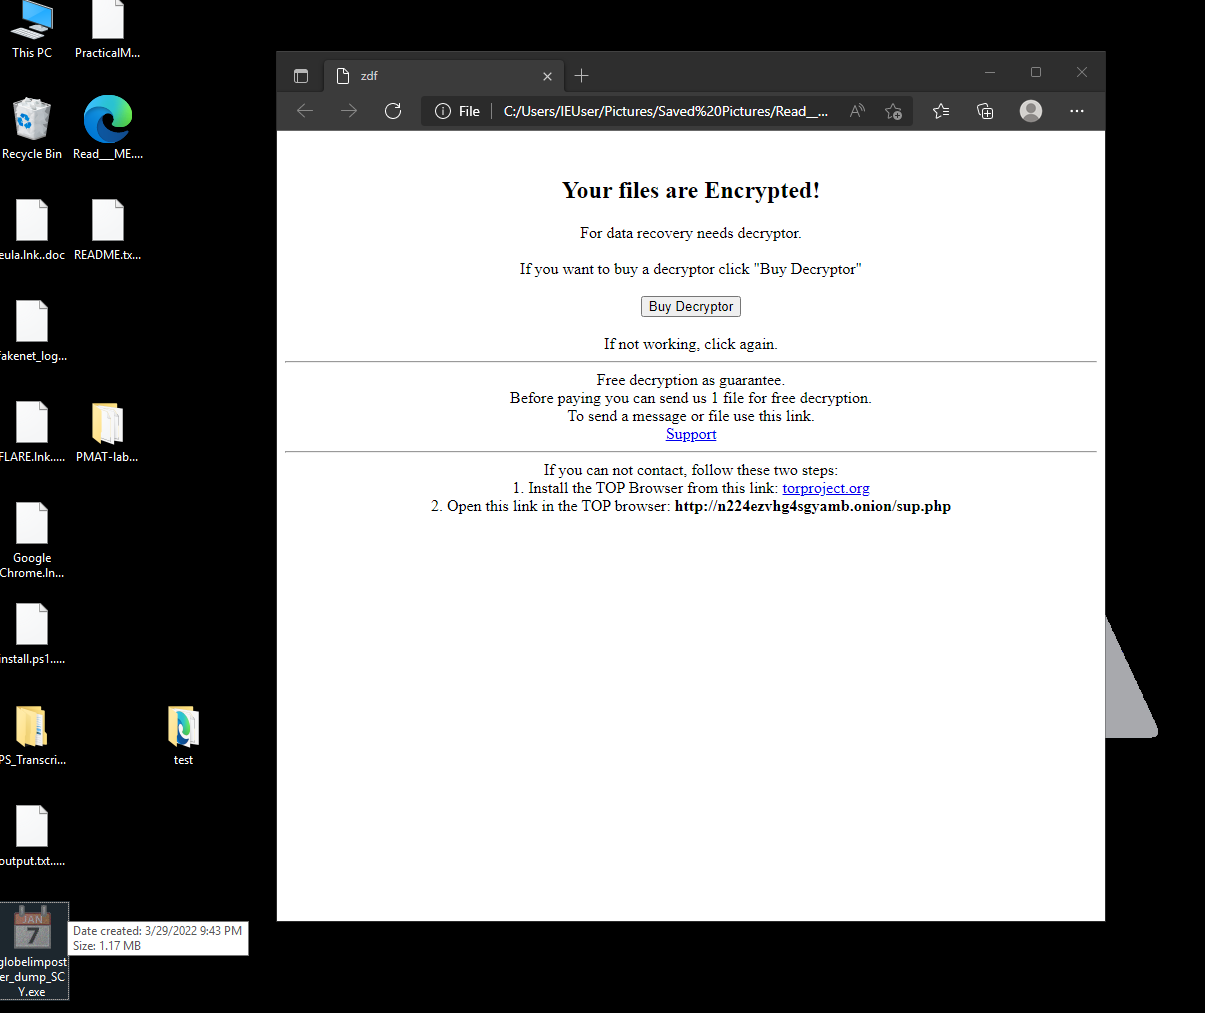
Amazing, the unpacked version works flawlessly, We successfully unpacked the malware sample.
Conclusion
Learning more deep into packers and unpacking techniques was something that I have pending for a while on my TODO list. I have to admit that it’s not my first time unpacking malware, I have some experience, but mostly I relied on tools to unpack it. This was a good learning experience since I can understand how the PE is constructed and this way build better tools or perform a better analysis on PE files. I have a Exploit Development background, I feel comfortable with debuggers and disassemblers, so much of the tools came in handy to me, but also I learned some new tricks that I hope I was able to showcase to you.
I have to say that the File structure is something that really amazes me, and I would like to continue learning about this, maybe I will prepare a future post about the ELF format.
I hope this post is useful to someone trying to learn about PE and packers.
References
Below are the URL used for this post:
https://docs.fileformat.com/executable/exe/
https://docs.microsoft.com/en-us/windows/win32/debug/pe-format
https://www.trustwave.com/images/slblog-03-02-2018-10-57-10/spiderlabs/85e5a55d-2522-4483-836a-1726932dec1f.png?v=0.0.1
https://securelist.com/the-devils-in-the-rich-header/84348/
https://github.com/Alexpux/mingw-w64/blob/master/mingw-w64-tools/widl/include/winnt.h
https://github.com/upx
https://www.corelan.be/index.php/2010/02/25/exploit-writing-tutorial-part-9-introduction-to-win32-shellcoding/
https://blog.malwarebytes.com/detections/ransom-globeimposter/#:~:text=GlobeImposter%20is%20a%20ransomware%20application,mimics%20the%20Globe%20ransomware%20family%20.
http://clsexploits.info/
https://github.com/erocarrera/pefile
https://bidouillesecurity.com/tutorial-writing-a-pe-packer-intro/
https://www.arridae.com/blogs/Packed-Malware.php
https://stackoverflow.com/questions/35685589/how-do-i-make-space-for-my-code-cave-in-a-windows-pe-32bit-executable
https://www.varonis.com/blog/x64dbg-unpack-malware